A Definitive Guide to Fine-Tuning LLMs Using Axolotl and Llama-Factory
Large Language Model (LLM) training or fine-tuning is an essential task that most enterprises eventually need to undertake when they decide to deploy an open source LLM in production.
Fine-tuning ensures optimal performance and alignment with specific tasks and business needs. Open-source LLMs are trained on massive amounts of generic data and fine-tuning helps tailor the model to an enterprise’s unique domain, terminology, and style. Typically this is achieved by training it on a smaller, more relevant dataset. Eventually, this process improves accuracy, reduces irrelevant or misleading responses, and allows for better control over the model’s output, making it reliable for mission-critical applications.
In this guide, we will showcase steps to fine-tuning Mistral 7b, using two different open source tools - using Axolotl, or using Llama-Factory.
Axolotl is a versatile open-source tool specifically designed for fine-tuning LLMs. It supports popular training methods like LoRA and full fine-tuning, and offers easy integration with performance-boosting technologies like Xformers.
Similarly, LLaMA-Factory is another open source tool that simplifies the fine-tuning process. It also offers diverse methods like LoRA, full fine-tuning, and reinforcement learning, along with options for memory-efficient quantization techniques, making LLM customization accessible on different hardware setups.
In this article, we will use Mistral 7B as our model, which has rapidly become the darling of the AI community due to its small size and high precision.
Prerequisite (Optional)
There are two key prerequisites - a server with an Ampere GPU, such as A100, and a working conda setup.
For the A100 GPU, you can use any of the cloud platforms like Google Cloud, AWS, Lambda Labs or E2E Networks, depending on which region you are and what works for your budget. For this particular guide, we used Google Cloud startup credits (thank you Google).
In many cloud GPU setups, conda is pre-installed. However, if it isn’t then follow the steps below:
$ cd /tmp
$ sudo apt install curl
$ curl -O https://repo.anaconda.com/archive/Anaconda3-2019.03-Linux-x86_64.sh
$ sha256sum Anaconda3-2019.03-Linux-x86_64.sh
$ bash Anaconda3-2019.03-Linux-x86_64.sh
The last step installs conda in your home directory. Once this is done, you need to restart your shell.
Then move to the next step below.
Steps to Fine-Tuning Mistral 7B Using Axolotl
Axolotl is a great tool, but its documentation is not easy to follow. Also, if you don’t follow the steps below exactly, you may encounter hard-to-debug errors.
Let’s start.
Installation of Axolotl
To begin with, we need to create a conda environment.
$ conda create -n axolotl python=3.10
$ conda activate axolotl
$ conda install -y -c "nvidia/label/cuda-12.1.1" cuda
$ pip install torch==2.1.2 torchvision==0.16.2 torchaudio==2.1.2 --index-url https://download.pytorch.org/whl/cu121
Make sure the versions are exactly as mentioned above, otherwise you may run into errors.
Once the above is done, then go ahead and clone the axolotl repository and install the requirements.
git clone https://github.com/OpenAccess-AI-Collective/axolotl
cd axolotl
pip3 install packaging
pip3 install -e '.[flash-attn,deepspeed]'
pip install -U git+https://github.com/huggingface/peft.git
Axolotl should now be installed and ready to use.
Preparation
Axolotl expects the dataset for fine-tuning to be in jsonl format. Axolotl has already provided the yaml files needed for training.
Before we train our model, let’s first organize our work into a nice folder structure that we can repurpose for other models later.
Following is a recommended folder structure:
/home/(username)/workspace/models
/home/(username)/workspace/dataset

/home/(username)/workspace/(training-folder)
/home/(username)/workspace/(training-folder)/output
/home/(username)/workspace/(training-folder)/youryaml.yaml
Create the above folders using mkdir. Once they are created, go back to the axolotl folder (which was created through git clone).
We will create a training folder based on the above directory structure and copy over the config.yml to our training folder.
cd axolotl
mkdir /home/(username)/workspace/mistral-7b-training/
cp examples/mistral/qlora.yml /home/(username)/workspace/mistral-7b-training/
Now let’s take a look at the config.yml file:
base_model: mistralai/Mistral-7B-v0.1
model_type: MistralForCausalLM
tokenizer_type: LlamaTokenizer

load_in_8bit: false
load_in_4bit: false
strict: false

datasets:
  - path: mhenrichsen/alpaca_2k_test
    type: alpaca
dataset_prepared_path:
val_set_size: 0.05
output_dir: ./out

sequence_len: 8192
sample_packing: true
pad_to_sequence_len: true
eval_sample_packing: false

wandb_project:
wandb_entity:
wandb_watch:
wandb_name:
wandb_log_model:

gradient_accumulation_steps: 4
micro_batch_size: 2
num_epochs: 4
optimizer: adamw_bnb_8bit
lr_scheduler: cosine
learning_rate: 0.000005

train_on_inputs: false
group_by_length: false
bf16: auto
fp16:
tf32: false

gradient_checkpointing: true
early_stopping_patience:
resume_from_checkpoint:
local_rank:
logging_steps: 1
xformers_attention:
flash_attention: true

warmup_steps: 10
evals_per_epoch: 4
eval_table_size:
eval_max_new_tokens: 128
saves_per_epoch: 1
debug:
deepspeed:
weight_decay: 0.0
fsdp:
fsdp_config:
special_tokens:
  bos_token: '<s>'
  eos_token: '</s>'
  unk_token: '<unk>'
Here’s an explanation of the parameters:
- base_model: this is the pre-trained model you are fine-tuning
- model_type: Mistral is a causal LLM, so keep the value as is
- tokenizer: the tokenizer format is the one used by Llama, so we can keep it as is
- load_in_8bit: false if don’t want to quantize the model to 8 bit
- load_in_4bit: false if you don’t want to quantize the model to 4 bit
- datasets: this contains the dataset and the type
- output_dir: set this to the output directory
- wandb_*: if you want to use wandb for tracking your model training, you can set the values here
- epochs: number of epochs you want to train for
Dataset
To train using Axolotl, the dataset should be in jsonl format. The format looks like this:
{“conversations”: [{“from”: “Customer”, “value”: ”\”
{“conversations”: [{“from”: “Customer”, “value”: ”\”
{“conversations”: [{“from”: “Customer”, “value”: ”\”
…and so on.
Essentially, jsonl stores each JSON object as a separate line within a file, making it ideal for streaming large datasets.
For this training, we will use mhenrichsen/alpaca_2k_test which has been preformatted in jsonl format.
Training Process
Now let’s kickstart the training process
accelerate launch -m axolotl.cli.train examples/mistral/config.ymlaccelerate launch -m axolotl.cli.train examples/mistral/config.yml
Your training process will now start. You will see output like this:
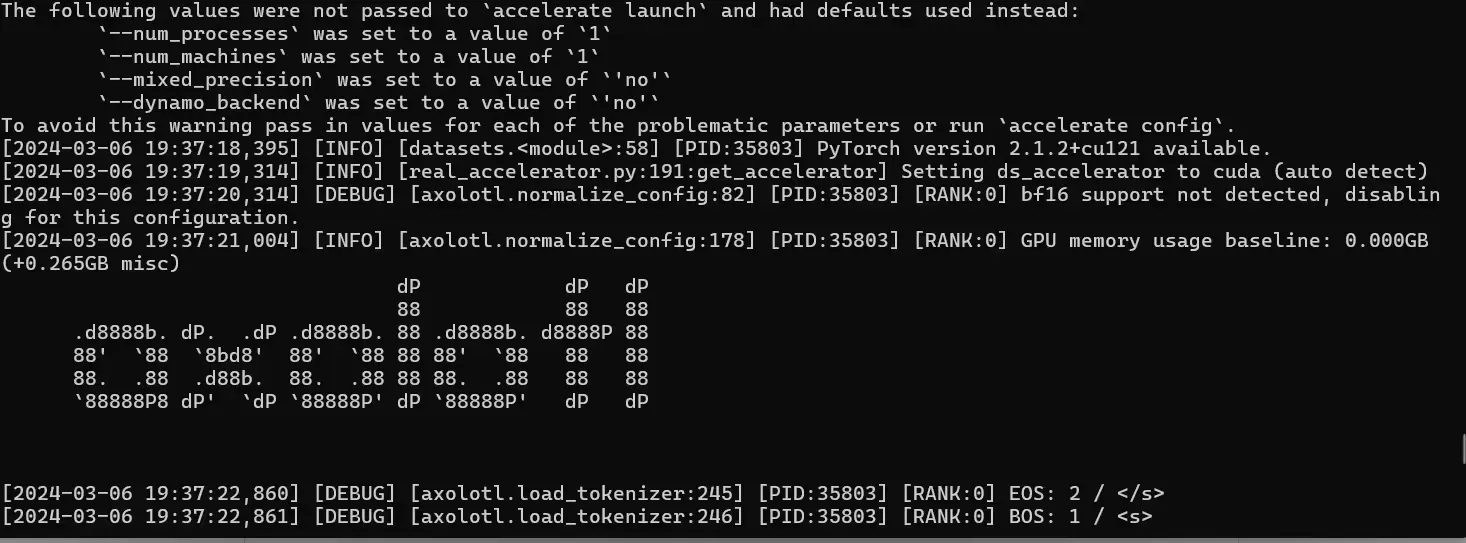
Depending on the capability of your GPU, the training time will vary.
Inference Using Gradio
You can also launch the inference endpoint using Gradio.
accelerate launch -m axolotl.cli.inference ./mistral-7b-training/config.yml --lora_model_dir="./models/mistral-7b-fine-tuned/" --gradioSteps to Fine-Tune Using Llama-Factory
Another approach to no-code fine-tuning is by use of Llama-Factory. Llama-Factory has the following USPs:
- Support for a range of models: LLaMA, Mistral, Mixtral-MoE, Qwen, Yi, Gemma, Baichuan, ChatGLM, Phi, etc. Similar to axolotl.
- Several integrated fine-tuning methods: (Continuous) pre-training, supervised fine-tuning, reward modeling, PPO and DPO.
- Works on various setups: 32-bit full-tuning, 16-bit freeze-tuning, 16-bit LoRA, 2/4/8-bit QLoRA via AQLM/AWQ/GPTQ/LLM.int8. This allows you to decide the method based on your configuration.
- Support for advanced algorithms: DoRA, LongLoRA, LLaMA Pro, LoftQ, agent tuning.
- Support fine-tuning tricks: FlashAttention-2, Unsloth, RoPE scaling, NEFTune, rsLoRA.
- Integrates with training monitors: LlamaBoard, TensorBoard, Wandb, MLflow, etc.
It also has a UI, and points to a future where LLM fine-tuning will be mostly a no-code affair.
cd /home/(username)/workspace/
git clone https://github.com/hiyouga/LLaMA-Factory.git
conda create -n llama_factory python=3.10
conda activate llama_factory
cd LLaMA-Factory
pip install -r requirements.txt
This completes the installation step.
Pre-Training
To pre-train a model using Llama-Factory, you can do it using a single command. We will assume that you are already inside the LLaMA-Factory directory.
mkdir ../models/
pip install --upgrade huggingface_hub
huggingface-cli login
This will enable you to download gated models from HuggingFace, such as Mistral, Gemma or Llama2 (make sure you have gone to model repo, requested access and received it).
For pre-training using LoRA, the following command does the job:
CUDA_VISIBLE_DEVICES=0 python ./src/train_bash.py \
    --stage pt \
    --do_train \
    --model_name_or_path mistralai/Mistral-7B-v0.1 \
    --dataset c4_demo \
    --dataset_dir ./data \
    --finetuning_type lora \
    --lora_target q_proj,v_proj \
    --output_dir ../models/Mistral-7B/lora/pretrain \
    --overwrite_cache \
    --overwrite_output_dir \
    --cutoff_len 1024 \
    --preprocessing_num_workers 16 \
    --per_device_train_batch_size 1 \
    --per_device_eval_batch_size 1 \
    --gradient_accumulation_steps 8 \
    --lr_scheduler_type cosine \
    --logging_steps 10 \
    --warmup_steps 20 \
    --save_steps 100 \
    --eval_steps 100 \
    --evaluation_strategy steps \
    --load_best_model_at_end \
    --learning_rate 5e-5 \
    --num_train_epochs 3.0 \
    --max_samples 10000 \
    --val_size 0.1 \
    --plot_loss \
    --fp16
You will have to wait a bit, while the model downloads (you won’t see any output when that is happening). Once that happens, you will start seeing the training steps:
03/07/2024 13:27:13 - INFO - llmtuner.model.patcher - Gradient checkpointing enabled.
03/07/2024 13:27:13 - INFO - llmtuner.model.adapter - Fine-tuning method: LoRA
03/07/2024 13:27:13 - INFO - llmtuner.model.loader - trainable params: 4194304 || all params: 6742609920 || trainable%: 0.0622
[INFO|trainer.py:601] 2024-03-07 13:27:13,416 >> Using auto half precision backend
[INFO|trainer.py:1812] 2024-03-07 13:27:13,607 >> ***** Running training *****
[INFO|trainer.py:1813] 2024-03-07 13:27:13,607 >>   Num examples = 156
[INFO|trainer.py:1814] 2024-03-07 13:27:13,607 >>   Num Epochs = 3
[INFO|trainer.py:1815] 2024-03-07 13:27:13,607 >>   Instantaneous batch size per device = 1
[INFO|trainer.py:1818] 2024-03-07 13:27:13,607 >>   Total train batch size (w. parallel, distributed & accumulation) = 8
[INFO|trainer.py:1819] 2024-03-07 13:27:13,607 >>   Gradient Accumulation steps = 8
[INFO|trainer.py:1820] 2024-03-07 13:27:13,607 >>   Total optimization steps = 57
[INFO|trainer.py:1821] 2024-03-07 13:27:13,609 >>   Number of trainable parameters = 4,194,304
{'loss': 2.0357, 'grad_norm': 0.06102440133690834, 'learning_rate': 2.5e-05, 'epoch': 0.51}
{'loss': 2.0788, 'grad_norm': 0.06413153558969498, 'learning_rate': 5e-05, 'epoch': 1.03}
{'loss': 2.0041, 'grad_norm': 0.08780788630247116, 'learning_rate': 4.151686808475204e-05, 'epoch': 1.54}
{'loss': 2.0898, 'grad_norm': 0.10164147615432739, 'learning_rate': 2.182455450632803e-05, 'epoch': 2.05}
{'loss': 2.004, 'grad_norm': 0.10297570377588272, 'learning_rate': 4.2872587689039484e-06, 'epoch': 2.56}
100%|██████████████████████████████████████████████████████████████████████████████████████████| 57/57
The model will be saved in the models folder you had created.
SFT - Supervised Fine-Tuning
For SFT on the Mistral-7B model.
CUDA_VISIBLE_DEVICES=0 python ./src/train_bash.py \
    --stage sft \
    --do_train \
    --model_name_or_path mistralai/Mistral-7B-v0.1 \
    --dataset alpaca_gpt4_en,glaive_toolcall \
    --dataset_dir ./data \
    --template default \
    --finetuning_type lora \
    --lora_target q_proj,v_proj \
    --output_dir ../models/Mistral-7B/lora/sft \
    --overwrite_cache \
    --overwrite_output_dir \
    --cutoff_len 1024 \
    --preprocessing_num_workers 16 \
    --per_device_train_batch_size 1 \
    --per_device_eval_batch_size 1 \
    --gradient_accumulation_steps 8 \
    --lr_scheduler_type cosine \
    --logging_steps 10 \
    --warmup_steps 20 \
    --save_steps 100 \
    --eval_steps 100 \
    --evaluation_strategy steps \
    --load_best_model_at_end \
    --learning_rate 5e-5 \
    --num_train_epochs 3.0 \
    --max_samples 3000 \
    --val_size 0.1 \
    --plot_loss \
    --fp16
DPO
To perform DPO on your fine-tuned model:
CUDA_VISIBLE_DEVICES=0 python ../../src/train_bash.py \
    --stage dpo \
    --do_train \
    --model_name_or_path mistralai/Mistral-7B-v0.1 \
    --adapter_name_or_path ../models/Mistral-7B/lora/sft \
    --create_new_adapter \
    --dataset comparison_gpt4_en \
    --dataset_dir ./data \
    --template default \
    --finetuning_type lora \
    --lora_target q_proj,v_proj \
    --output_dir ../models/Mistral-7B/lora/dpo \
    --overwrite_cache \
    --overwrite_output_dir \
    --cutoff_len 1024 \
    --preprocessing_num_workers 16 \
    --per_device_train_batch_size 1 \
    --per_device_eval_batch_size 1 \
    --gradient_accumulation_steps 8 \
    --lr_scheduler_type cosine \
    --logging_steps 10 \
    --warmup_steps 20 \
    --save_steps 100 \
    --eval_steps 100 \
    --evaluation_strategy steps \
    --load_best_model_at_end \
    --learning_rate 1e-5 \
    --num_train_epochs 1.0 \
    --max_samples 1000 \
    --val_size 0.1 \
    --dpo_ftx 1.0 \
    --plot_loss \
    --fp16
For Distributed Training on Multi-GPU Setups
To train on multi-gpu setups, you would need to use Hugging Face accelerate.
First, create a config file like this:
compute_environment: LOCAL_MACHINE
debug: false
distributed_type: MULTI_GPU
downcast_bf16: 'no'
gpu_ids: all
machine_rank: 0
main_training_function: main
mixed_precision: fp16
num_machines: 1
num_processes: 4
rdzv_backend: static
same_network: true
tpu_env: []
tpu_use_cluster: false
tpu_use_sudo: false
use_cpu: false
Save this as config.yml.
Next, run this command:
accelerate launch --config_file config.yaml src/train_bash.py # rest of the arguments like above - for pre-training, sft, dpo etc.For instance, for pre-training on a Multi-GPU setup, you would have to execute this:
accelerate launch --config_file config.yaml src/train_bash.py \
    --stage pt \
    --do_train \
    --model_name_or_path mistralai/Mistral-7B-v0.1 \
    --dataset c4_demo \
    --dataset_dir ./data \
    --finetuning_type lora \
    --lora_target q_proj,v_proj \
    --output_dir ../models/Mistral-7B/lora/pretrain \
    --overwrite_cache \
    --overwrite_output_dir \
    --cutoff_len 1024 \
    --preprocessing_num_workers 16 \
    --per_device_train_batch_size 1 \
    --per_device_eval_batch_size 1 \
    --gradient_accumulation_steps 8 \
    --lr_scheduler_type cosine \
    --logging_steps 10 \
    --warmup_steps 20 \
    --save_steps 100 \
    --eval_steps 100 \
    --evaluation_strategy steps \
    --load_best_model_at_end \
    --learning_rate 5e-5 \
    --num_train_epochs 3.0 \
    --max_samples 10000 \
    --val_size 0.1 \
    --plot_loss \
--fp16Inferencing
You can also create an inference endpoint easily. Here’s how:
python src/cli_demo.py \
    --model_name_or_path mistralai/Mistral-7B-v0.1 \
    --adapter_name_or_path ../models/Mistral-7B/lora/sft/(checkpoint_folder) \
    --template default \
    --finetuning_type lora
Conclusion
As you can see, both the tools allow you to perform pre-training or fine-tuning of a range of LLMs. Axolotl is a little harder because the installation steps and dependencies are not clearly defined. LLaMa-Factory works out of the box without any problems. Ensure you use an A100 or Ampere GPU.
At Superteams.ai, we offer fully-managed fractional AI teams to solve business problems in a variety of domains. Leverage the power of AI today by reaching out to us at [email protected].


-Feature-Image.CjBFdO7y_Z1bTNvg.webp)