AI is shaking up every industry you can think of—healthcare, finance, entertainment, education, and yes, even real estate. Tasks that used to need expensive specialists, weeks of back-and-forth, and a big budget? Now you can do them in minutes, thanks to AI-powered image generation.
Real estate photography is a great example. Until recently, agents had to choose between listing empty, uninspiring rooms or spending a small fortune on physical staging. Now, with AI, you get the best of both worlds: virtual staging that’s not only affordable, but also incredibly flexible and powerful.
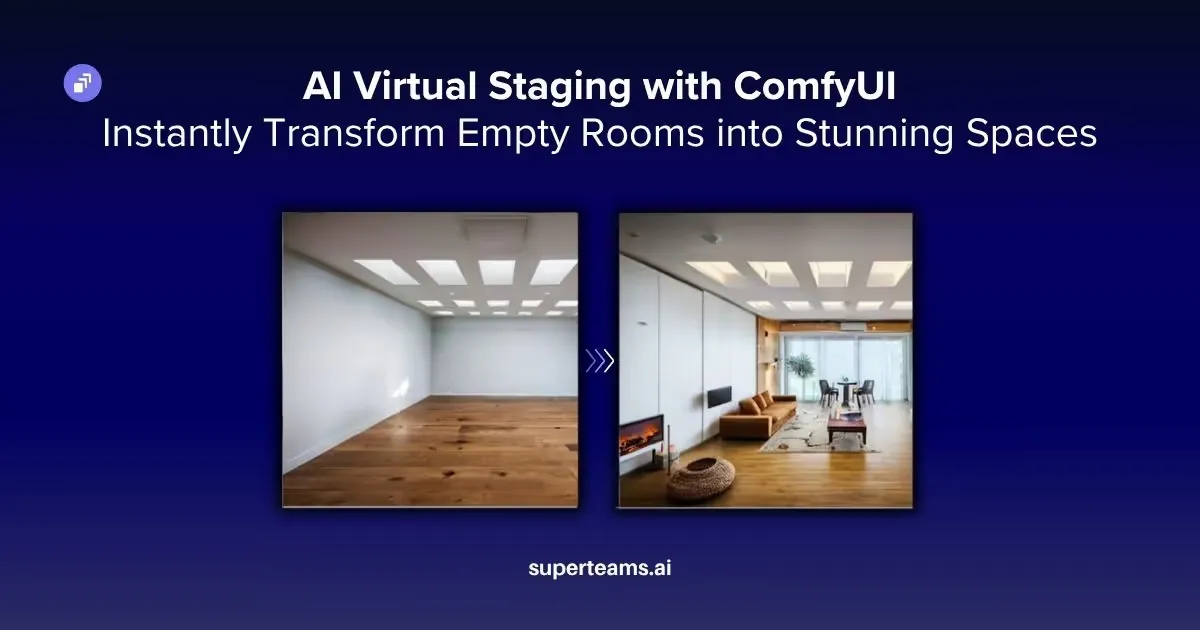
That’s where ComfyUI comes in. It’s a node-based AI workflow platform that puts professional virtual staging right at your fingertips: no technical wizardry required. In this guide, we’ll show you how to use a dual-ControlNet setup to turn empty rooms into beautifully furnished spaces. By the end, you’ll know how to build a workflow where you’re in charge of every design detail, from furniture placement to the overall vibe.
![]()
Why Choose ComfyUI for Virtual Staging?
Traditional staging services can cost around $25-75 per room, with turnaround times of 24-48 hours. ComfyUI offers several advantages over these traditional methods:
- Cost Efficiency: Once set up, you can stage unlimited rooms with virtually zero incremental cost—just the electricity to run your machine.
- Speed: ComfyUI completes stagings in minutes rather than hours.
- Customization: It provides full control over furniture styles, layouts, and aesthetics.
- Flexibility: Easy adaptation for different room types and design styles.
Understanding the Workflow Architecture
This virtual staging system uses a dual-ControlNet setup that brings together depth and edge detection. That way, the furniture doesn’t just look good—it actually fits the room’s layout and keeps all the original architectural details in place.
The workflow processes input images through multiple stages:
- Depth analysis using DepthAnything V2 for spatial understanding.
- Canny edge detection for structural boundary preservation.
- Dual ControlNet conditioning for precise furniture placement.
- Advanced sampling with carefully tuned parameters.
Setting Up the Environment
Before we dive into building the workflow, make sure you’ve got ComfyUI and all the necessary components set up. You’ll also need a computer with a compatible GPU and Python 3.x installed.
Steps to Start Comfy UI
1. First, clone the ComfyUI repository:
git clone https://github.com/comfyanonymous/ComfyUI.git
cd ComfyUI
2. Install the necessary dependencies to launch ComfyUI.
pip install torch torchvision torchaudio --index-url
https://download.pytorch.org/whl/cu121
pip install -r requirements.txt
3. Run ComfyUI.
python main.pyNote: “pip install -r requirements.txt” should be run after installing torch and related packages.
Required Models
Download these models to your ComfyUI models directory:
Base Model
sd_xl_base_1.0.safetensors - Place in models/checkpoints/SDXL/ (Download Url)
ControlNet Models
control-lora-depth-rank256.safetensors - Place in models/controlnet/SDXL/ (Download Url)
DepthAnything V2 Model
Depth_anything_v2_vitl_fp32.safetensors - This will be auto-downloaded by the workflow; no manual step required.
Essential Custom Nodes
Install these extensions using the ComfyUI Manager, accessible from the ComfyUI interface.
comfyui-depthanythingv2
comfyui-advanced-controlnet
These extensions provide the advanced depth analysis and multi-layer ControlNet functionality crucial for professional-quality results.
Understanding the Workflow Components
![]()
Before we start building, let’s understand what each component does and why it’s important for professional virtual staging results.
Key Components
The key components powering this workflow are:
- Checkpoint Loader: Load the Stable Diffusion SDXL base model which provides the foundational image generation capabilities. SDXL’s higher resolution output and improved understanding makes it ideal for architectural applications.
- ControlNet Loaders: Configure two separate ControlNet loaders: one for depth control and another for edge detection. This dual approach gives you more control over how the AI interprets and respects the room’s geometry.
Image Input and Preprocessing
- Load Image Node: This serves as your input gateway. The node outputs three identical copies of your image, which we’ll process through different pipelines:
- Original image for VAE encoding
- Copy for depth analysis
- Copy for edge detection
- Input Requirements: For optimal results, your input images should be:
- High resolution (1024x1024 or higher)
- Well-lit with minimal shadows
- Show clear room boundaries and architectural features
Tip: Lower quality images may result in less realistic results.
Depth Analysis Pipeline
The depth understanding component is crucial for realistic furniture placement.
- DepthAnything V2 Processing: This advanced depth estimation model analyzes your room image to create a detailed depth map. Unlike simpler depth detection methods, DepthAnything V2 provides:
- Accurate distance estimation for furniture scaling
- Information about how surfaces are oriented, which helps with realistic furniture placement
- Robust performance across different lighting conditions
- Understanding of room geometry and spatial relationships
The depth map becomes the foundation for ensuring furniture appears properly positioned within the three-dimensional space of the room.
Edge Detection Layer
- Canny Edge Detection: Configure the Canny node with these optimal parameters:
- Low threshold: 0.4
- High threshold: 0.8
These settings capture essential architectural features like wall corners, door frames, and windows while filtering out noise. The edge information helps maintain clean lines and prevents furniture from appearing to float or intersect with walls.
Prompt Engineering for Virtual Staging
Effective prompting is necessary to achieve realistic staging results. Our workflow uses carefully crafted positive and negative prompts.
- Positive Prompt
“Complete furnished bedroom with large bed, wooden nightstands, table lamps, dresser with mirror, wall paintings, floor plants, decorative pillows, blankets, area rug, fully decorated room, abundant bedroom furniture, interior design, cozy bedroom setup”
This prompt emphasizes:
- Completeness and abundance of furniture
- Specific furniture pieces with realistic proportions
- Decorative elements that add warmth and livability
- Professional interior design aesthetic
- Negative Prompt
“wall color changes, ceiling color changes, beige walls, warm wall tones, different wall colors, ceiling modifications, architectural style changes, room color scheme changes, lighting changes, structural alterations”
The negative prompt prevents the AI from:
- Modifying existing wall colors or textures
- Changing architectural features
- Altering the room’s structural elements
- Inconsistent lighting that would look unnatural
Dual ControlNet Application
The heart of our staging system lies in the sophisticated dual ControlNet setup.
- Primary ControlNet (Depth)
- Strength: 0.55
- Start: 0.0
- End: 0.4
This configuration ensures strong depth adherence during the initial generation phases, establishing proper spatial relationships for furniture placement.
- Secondary ControlNet (Canny)
- Strength: 0.25
- Start: 0.0
- End: 0.3
The edge control layer provides subtle guidance for maintaining architectural boundaries without overpowering the depth information.
Advanced Sampling Configuration
- KSampler Parameters
- Steps: 150 (high step count for detailed furniture generation)
- CFG: 17 (strong prompt adherence for complex scenes)
- Scheduler: DPM++ 2M Karras
- Denoise: 0.72
These parameters balance quality with generation speed. The high step count ensures detailed furniture rendering, while the moderate denoising strength preserves the original room structure.
Building the Workflow: Step-by-Step Implementation
Now that you understand the components, let’s build the complete workflow from scratch.
Step 1: Load the Foundation Models
Setting Up the Core Components
Begin by adding the CheckpointLoaderSimple node and load sd_xl_base_1.0.safetensors. This provides the base SDXL model with its MODEL, CLIP, and VAE outputs that power the entire workflow
The SDXL model provides high resolution and better architectural understanding, making it perfect for virtual staging. Its three outputs will connect to different parts of your workflow: the MODEL for generation, CLIP for text understanding, and VAE for image encoding/decoding.
![]()
Step 2: Add Image Input
Preparing Your Empty Room
Add a Load Image node and load your empty room photograph. This node outputs your image to three different processing paths simultaneously.
Ensure your input image is high resolution (1024x1024 or higher) with good lighting and clear architectural features. The cleaner your input image, the better your staging results will be.
![]()
Step 3: Setup Depth Analysis
Creating Spatial Understanding
Add both DownloadAndLoadDepthAnythingV2Model (select “depth_anything_v2_vitl_fp32.safetensors”) and DepthAnything_V2 nodes. Connect the model loader to the processor, and your image to the processor’s input.
This advanced depth estimation creates detailed 3D understanding of your room, ensuring that the furniture appears at correct distances and scales. The depth map helps prevent the furniture from floating or appearing incorrectly sized relative to the room size.
![]()
Step 4: Configure Edge Detection
Preserving Architectural Features
Add a Canny edge detection node with a low threshold of 0.4 and a high threshold of 0.8. Connect your original image to its input.
These settings help capture important structural elements like walls, doors, and windows while filtering out noise. The resulting edge map makes sure features like windows and doors are accurately preserved in the final image.
![]()
Step 5: Create Prompt Controls
Writing Generation Instructions
Add two CLIPTextEncode nodes, connecting both to the CLIP output from your checkpoint. Use a detailed positive prompt to describe the furniture you want, and a negative prompt to help preserve the room’s original structure.
![]()
Step 6: Apply Dual ControlNets
Implementing Precision Controls
First, add two ControlNetLoader nodes: load “control-lora-depth-rank256.safetensors” and “controlnet-canny-sdxl-1.0” respectively. Then add ControlNetApplyAdvanced (for depth and edges).
Connect your depth map and first ControlNet to the depth apply node (strength 0.55, end 0.4), then chain its output to the edge apply node along with your edge map and second ControlNet (strength 0.25, end 0.3). This dual control ensures that the furniture placement respects both 3D space and architectural boundaries.
![]()
Step 7: Set Up the Generation Pipeline
Building the Transformation Process
Add the VAEEncode node (connecting your original image and VAE), followed by the KSampler and VAEDecode nodes. Configure the KSampler with 150 steps, a CFG of 17, the scheduler set to “DPM++ 2M Karras,” and a denoise value of 0.72.
Connect your model, the final conditioning from the second ControlNet, and the encoded latent to the KSampler. Then, decode the output back to an image. These settings balance quality and speed, giving you detailed furniture while preserving the room’s original structure.
![]()
Step 8: Save Your Results
Finalizing the Workflow
Add a SaveImage node and connect it to your VAEDecode output. This completes your workflow and gets you ready to transform empty rooms into staged spaces.
Test it out with an empty room image—make sure all nodes are properly connected (no red indicators)—and click “Run.” Your first virtual staging should generate in 2–3 minutes, giving you a furnished room that preserves the original architecture.
![]()
Results
Let’s look at the results below:
![]()
![]()
![]()
Room-Specific Adaptations
Bedroom Staging
Bedrooms require careful attention to furniture scale and placement. Focus your prompts on:
- Bed as the central focal point
- Balanced nightstand arrangements
- Appropriate lighting fixtures
- Cozy textiles and decorative elements
Living Room Variations
Adapt the workflow for living spaces by modifying prompts to include:
- Sectional sofas or seating arrangements
- Coffee tables and side tables
- Entertainment centers or media units
- Area rugs that define seating areas
Kitchen and Bathroom Considerations
These spaces require a different approach:
- Emphasize built-in appliances and fixtures
- Focus on countertop styling and accessories
- Include appropriate storage solutions
- Maintain functionality while adding aesthetic appeal
Tailor your prompts and negative prompts for each room type to further enhance results.
Troubleshooting & Common Issues
Even with a streamlined ComfyUI workflow, you might run into some common problems during setup or generation. Here are quick solutions to frequent issues:
ComfyUI Won’t Start / Crashes Immediately
- Check the Python version: ComfyUI requires Python 3.8 or higher.
- Missing dependencies: Double-check that you’ve run pip install -r requirements.txt after installing PyTorch.
- Outdated GPU drivers: Ensure your graphics drivers (NVIDIA/AMD) are up to date.
CUDA or GPU Errors
- CUDA not found:
- Make sure you have a CUDA-compatible GPU.
- Install the correct version of CUDA Toolkit for your GPU and PyTorch version.
- Out of memory errors:
- Try reducing image resolution (e.g., 768x768 instead of 1024x1024).
- Close other applications using the GPU.
- Lower batch size or steps in your KSampler node.
Model Download Issues
- File not found:
- Verify that model files are placed in the correct ComfyUI folders (e.g., /models/checkpoints/SDXL/ for sd_xl_base).
- Double-check file names for typos.
- Slow downloads or failed downloads:
- Try downloading models manually from the official sources and moving them into the required directory.
- Check your internet connection and firewall settings.
Node Connection Errors
- Red indicator in ComfyUI node graph:
- This usually means an input or output is missing. Double-check connections between nodes.
- Ensure all custom nodes (like comfyui-depthanythingv2) are installed and properly loaded.
Generated Images Look Unrealistic or Messy
- Check your prompts:
- Refine both positive and negative prompts for clarity and relevance.
- Input image quality:
- Use well-lit, high-resolution images with clear boundaries.
- Model compatibility:
- Ensure you’re using compatible versions of SDXL and ControlNet models.
Custom Nodes Not Found
- Missing extensions:
- Make sure you’ve installed required custom nodes using the ComfyUI Manager or manually placed them in the /custom_nodes/ folder.
- Restart ComfyUI after installing new extensions.
Performance is Very Slow
- No GPU detected:
- ComfyUI can run on CPU, but it will be extremely slow. For best performance, use a machine with a modern NVIDIA GPU.
- Other tips:
- Lower image resolution, reduce steps in KSampler, and avoid running other heavy tasks at the same time.
How Superteams Can Help
Implementing advanced AI image-generation workflows like ComfyUI for virtual staging can be transformative; but getting everything set up, optimized, and integrated with your existing systems can be challenging. That’s where Superteams comes in.
If you’re a B2B SaaS platform looking to:
- Offer AI-powered virtual staging or design features to your users
- Integrate custom image-generation workflows directly into your product
- Build a scalable, secure, and production-ready solution
Superteams can help you:
- Set up and customize the entire ComfyUI workflow to fit your business needs
- Deploy on your preferred cloud or on-premise environment
- Integrate with your platform via API or custom dashboards
- Optimize performance, reliability, and user experience
Not ready for a custom solution?
**
**Join the waitlist for our upcoming Superteams platform, where you’ll be able to access AI image-generation tools, including virtual staging, directly through a user-friendly interface, with no technical setup required.
Contact us to discuss your requirements.


-Feature-Image.CjBFdO7y_Z1bTNvg.webp)