Introduction
Stable Diffusion has opened tremendous possibilities for creators, designers, artists, AI engineers, and photo editors to translate their imagination into reality through appropriate prompts. But classical Stable Diffusion alone is insufficient for specific use cases.
Peter is a creative director; and his team was trying to create posters for Taylor Swift’s Eras Tour. Being an engineering graduate and a tech enthusiast, he asked his team to create posters in volume using AI for the tour during the upcoming week. After consulting his techie friends, his team tried Stable Diffusion to generate some Taylor Swift images.
He was a bit disappointed as Stable Diffusion gave this result. The face and body parts were unclear and blurry. Being a Swiftie, he was adamant about designing 200 posters by the end of the week.
Out of anxiety, he asked his techie friend Noah for help. She explained to him the in and outs of Stable Diffusion and provided him with this link to read about the same: https://stable-diffusion-art.com/how-stable-diffusion-work/
Noah advised him to perform fine-tuning for his use case.
Fine-Tuning
Large models like Stable Diffusion are typically trained on general text-image pairs, which can make them unsuitable for understanding specific subjects and generating those subjects in various contexts. For instance, they may not excel at creating photorealistic images of Taylor Swift’s face in cinematic lighting.
In order to train Stable Diffusion for specific use cases, we reuse our model parameters as a starting point and train task-specific layers with a set of reference images.
In order to fine-tune the model, these are the most common techniques:
- Dreambooth
- Textual Inversion
- LORA
Dreambooth
Peter was amazed when he discovered that he could personalize Stable Diffusion to generate Taylor Swift images using only 4-6 images and fine-tuning.
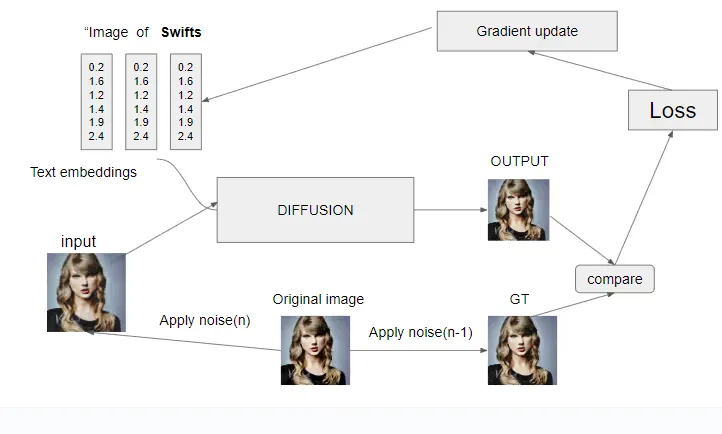
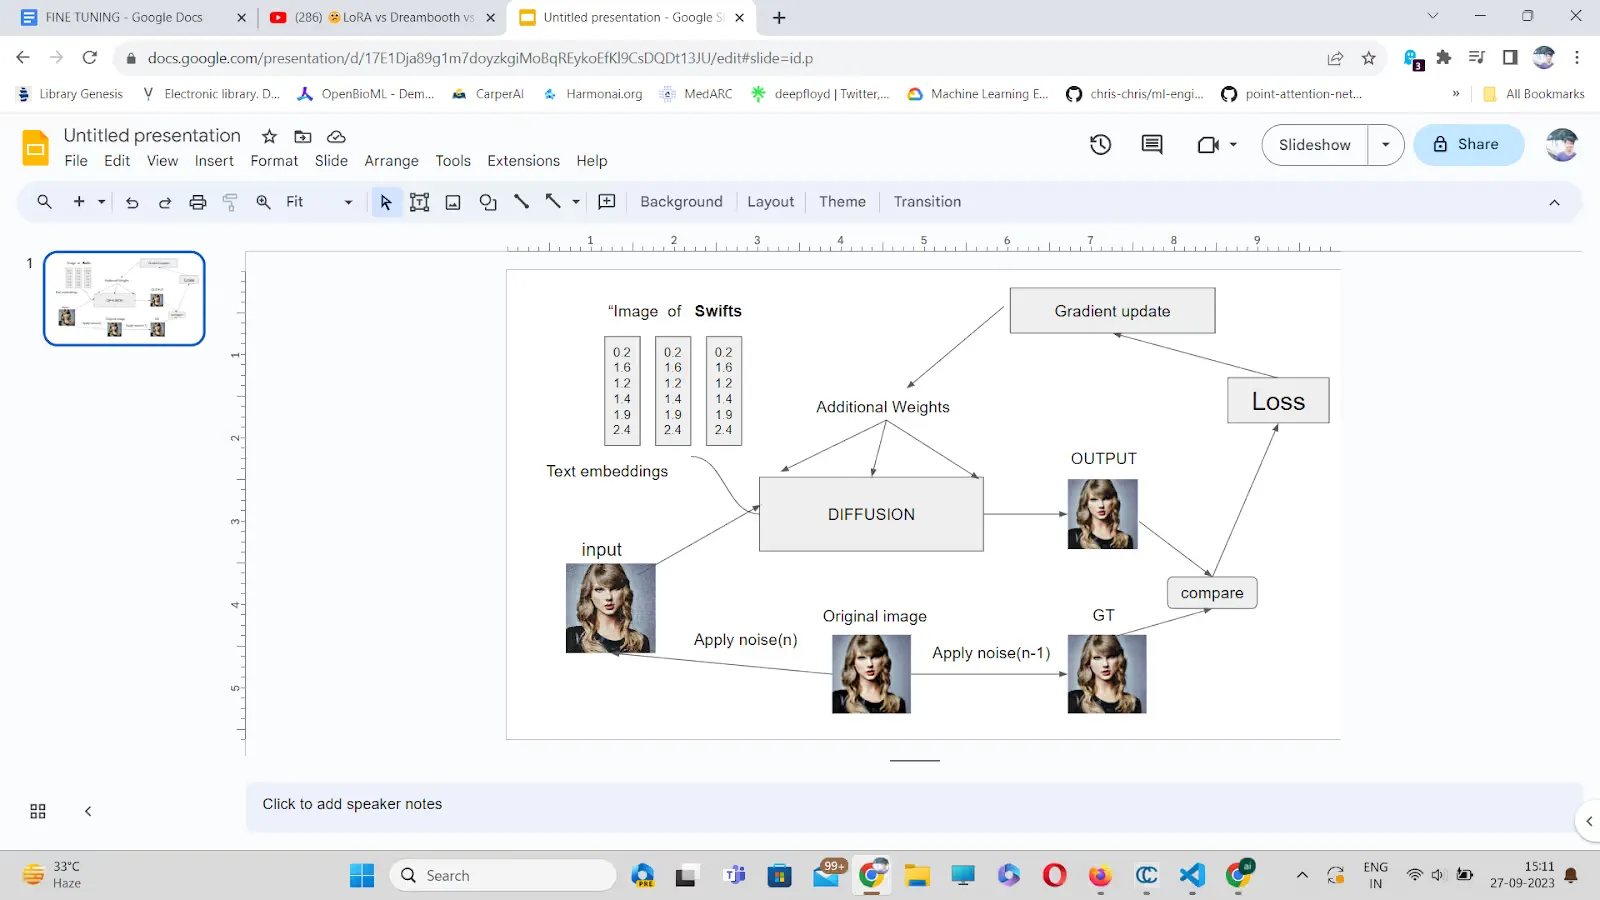
Dreambooth associates a unique identifier, such as “Swiftie” in this case, with the subject image, which is the image of Taylor Swift. Here is the workflow:
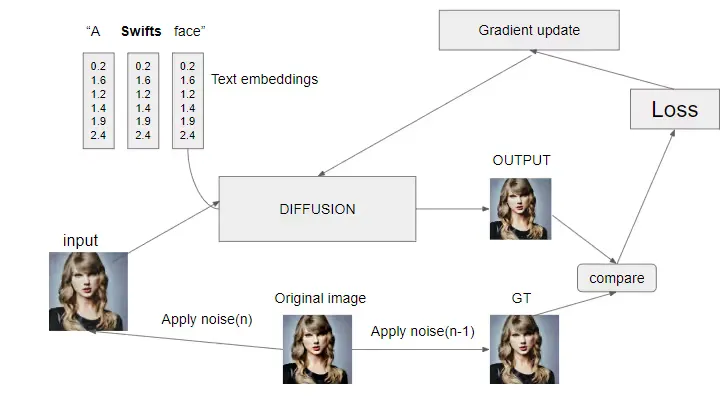
In this context, Swift serves as an identifier. The subject statement is transformed to text embeddings. Noise is added to the original image up to n steps to generate input for the model, along with an additional image of up to n-1 steps as ground truth. The input is then processed by the model to produce an output, which is compared to the ground truth to compute the loss. The gradient is updated, and training continues for 200 epochs.
However, there are two factors that can potentially disrupt the training process:
- Overfitting: Fine-tuning large Stable Diffusion models with just 3-5 images can lead to overfitting.
- Language Drift: This can result in the loss of information about embeddings. Language Models (LLMs) trained on extensive datasets and then fine-tuned for specific classes may lose the ability to generate a variety of instances belonging to that class. They might forget how to create different subjects within the same class. Similar issues can arise when fine-tuning Stable Diffusion.
In order to mitigate these issues, various solutions can be implemented:
- Prior Preservation in Training: In order to prevent overfitting and language drift, 200 images per class are generated and added to the training data. These images are created using Stable Diffusion itself.
- Prior Loss: Another option to maintain prior knowledge of a class is by introducing prior loss. This loss guides the embedding to generate images of the current class; the model is trained while also allowing it to modify the embedding to generate different instances of that class. This way, the Swiftie model aims to have both old knowledge and new knowledge, enhancing its ability to generalize.
To address these challenges, Peter employed prior preservation loss. These are the steps for Swiftie model training:
- Clone the repository.
- Install the necessary dependencies.
- Initialize an accelerated environment with various options.
- Launch training with prior preservation loss.
These steps were implemented to fine-tune the model and achieve the desired results.
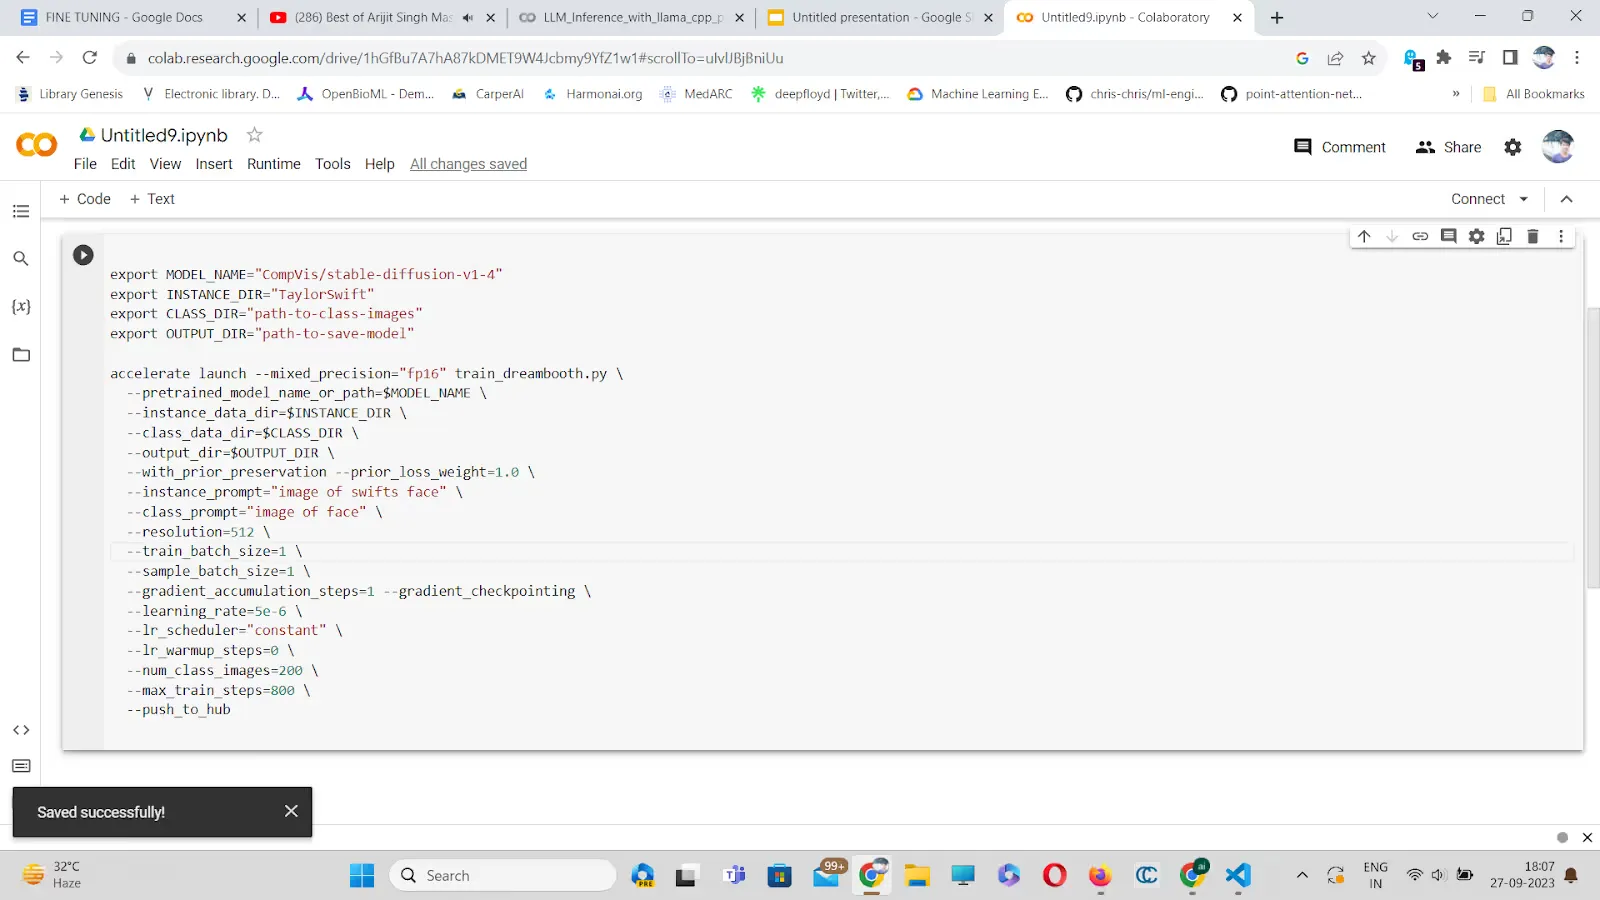
- Clone the repository:
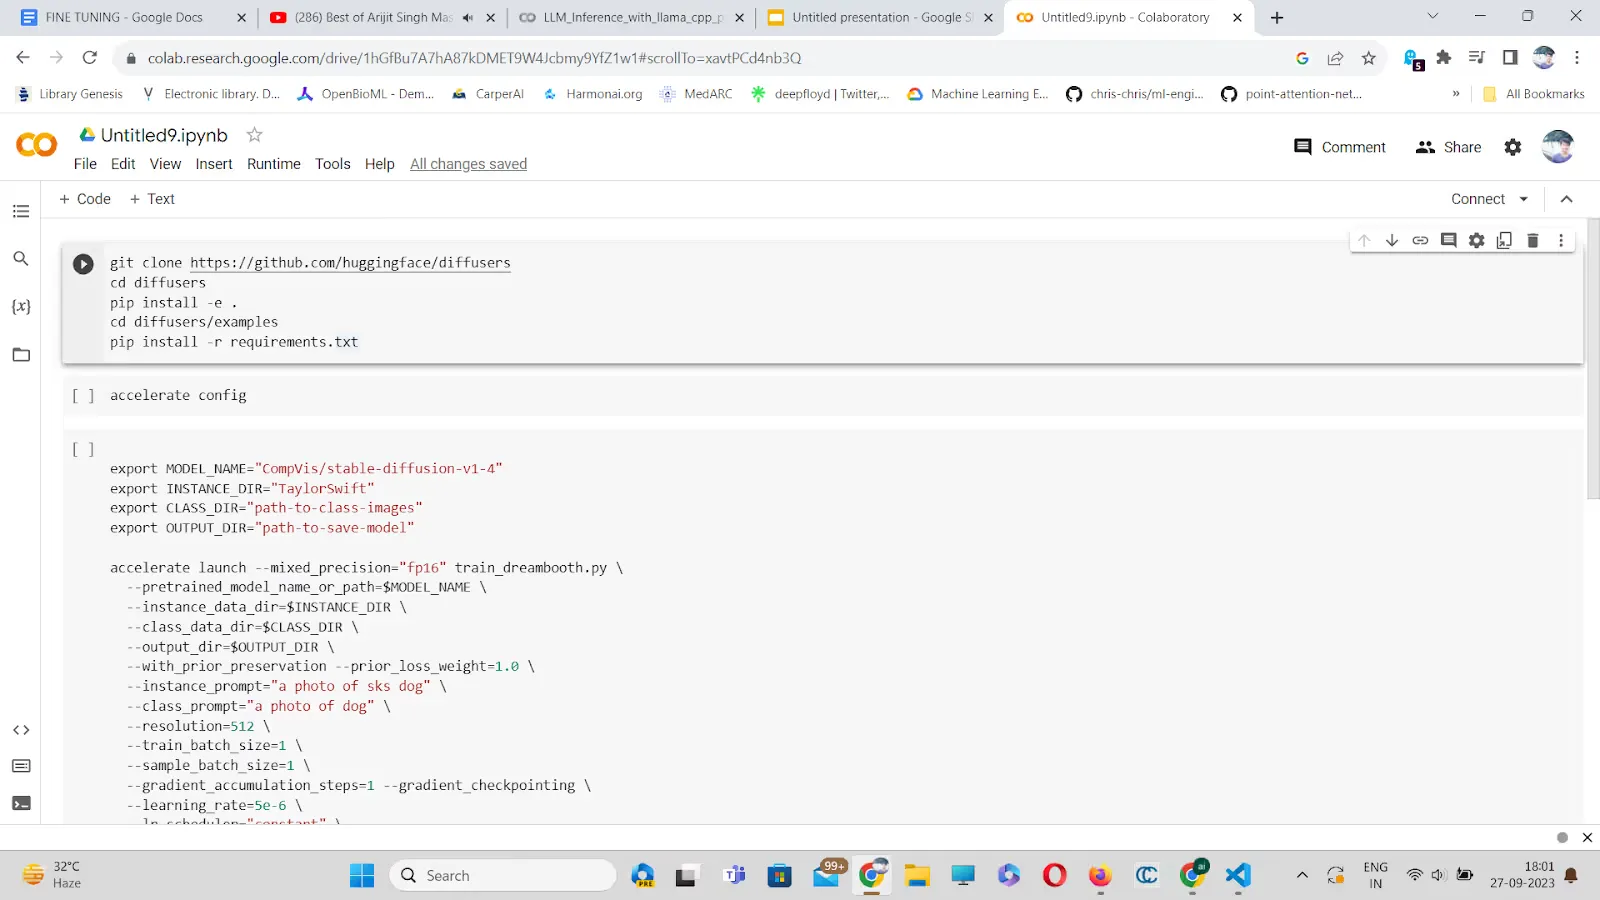
- Initialize an accelerated environment:
accelerate config
In the accelerated configuration, you will be presented with various options. Given that Peter is a graphic designer and has access to an 8GB GPU, he made specific choices to optimize his training set-up:
Peter, being a graphic designer with limited access to an 8GB GPU, decided to employ the following configurations:
- Deepspeed for Efficient Training: Peter chose to utilize Deepspeed to enhance the efficiency of parallel training. This decision was driven by the need to make the most of his constrained GPU resources.
- Mixed Precision with FP16: To achieve faster training with reduced memory consumption, Peter opted for mixed precision training, specifically using FP16 (16-bit floating-point precision). This approach allows for more efficient mathematical computations during the training process.
- Offloading Parameters and Optimizer to CPU: In order to further alleviate GPU memory constraints and optimize resource usage, Peter made the decision to offload both the model parameters and the optimizer to the CPU.
By configuring his training environment in this manner, Peter aimed to maximize the efficiency of his training process while effectively managing the limitations posed by his 8GB GPU.
- Now launch training with prior preservation loss:
It took a few hours for Peter’s team to train a swiftie model, and here is the result.
Prompt - Swiftie in Cinematic Lightning

Wow! Peter’s clients were astonished. How did he manage to deliver such outstanding results in a small amount of time? Thanks to Dreambooth.
Textual Inversion
As a technology enthusiast, Peter found great enjoyment in the fine-tuning process and harbored a desire to delve deeper into the experimentation. His curiosity led him to wonder whether he could incorporate the name “Taylor Swift” into Stable Diffusion’s lexicon. So he sought guidance from his friend, Noah.
Noah proceeded to introduce Peter to the concept of Textual Inversion.
To understand how Diffusion operates, it’s essential to grasp its underlying principles. Diffusion models are trained in a manner in which Gaussian noise is incrementally added to an image during a series of time steps (the forward process). Subsequently, the image is denoised, ultimately resulting in the generation of the original image (the reverse process).
Textual inversion, on the other hand, involves the integration of embeddings that establish a new relationship between text and images into a pre-trained Stable Diffusion model.
Eager to learn more, Peter posed a question to his tech-savvy acquaintance: “How can I generate these embeddings to incorporate ‘Taylor Swift’ into Stable Diffusion’s vocabulary?”
In response, Noah advised Peter to engage in the training process known as textual inversion. This approach entails feeding 3-5 images along with their associated text into a model, training it to operate in a manner akin to the diffusion reverse process. Hence, it earns the name “Textual Inversion.”
This approach differs from Dreambooth in several key ways:
- Gradient Updates for Text Embeddings: Unlike Dreambooth, in which the gradients are primarily updated for the model, in Textual Inversion, the focus is on updating the gradients for text embeddings. This means that the training process places a greater emphasis on refining the understanding of the text (e.g., “Swift”) in relation to Taylor Swift’s images.
- Utilizing Tiny Embeddings Instead of Large Checkpoints: Instead of working with large model checkpoints, Textual Inversion employs compact embeddings. These embeddings are more lightweight and specific, enhancing the model’s ability to comprehend and generate content related to Taylor Swift based on the provided text.
Eager to explore this approach further, Peter expressed a strong desire to get started as soon as possible. His tech-savvy friend recommended that he should leverage embeddings from a pre-trained source, which he promptly obtained from the https://civitai.com/models/4631/taylor-swift repository.
Peter proceeded to incorporate these embeddings into the web user interface (webUI) of the Automatic C111 repository, available at https://github.com/AUTOMATIC1111/stable-diffusion-webui, to experiment with their application.
The outcomes were as follows for the “Taylor Swift” prompt:

LORA
LORA is faster to train. It adds new intermediate layers to train the model. As fine-tuning proceeds, new weights of those intermediate layers are added to the final model. The weight to be updated is of less size compared to DreamBooth; therefore it takes less time to train.
Subsequently, Peter posed a question to Noah, inquiring about the necessity of adding extra layers in between. He wondered if it might be possible to introduce an entirely new model into Stable Diffusion for further fine-tuning.
In response, Noah confirmed yes, indeed, with some having explored an innovative technique known as “hypernetworks.”
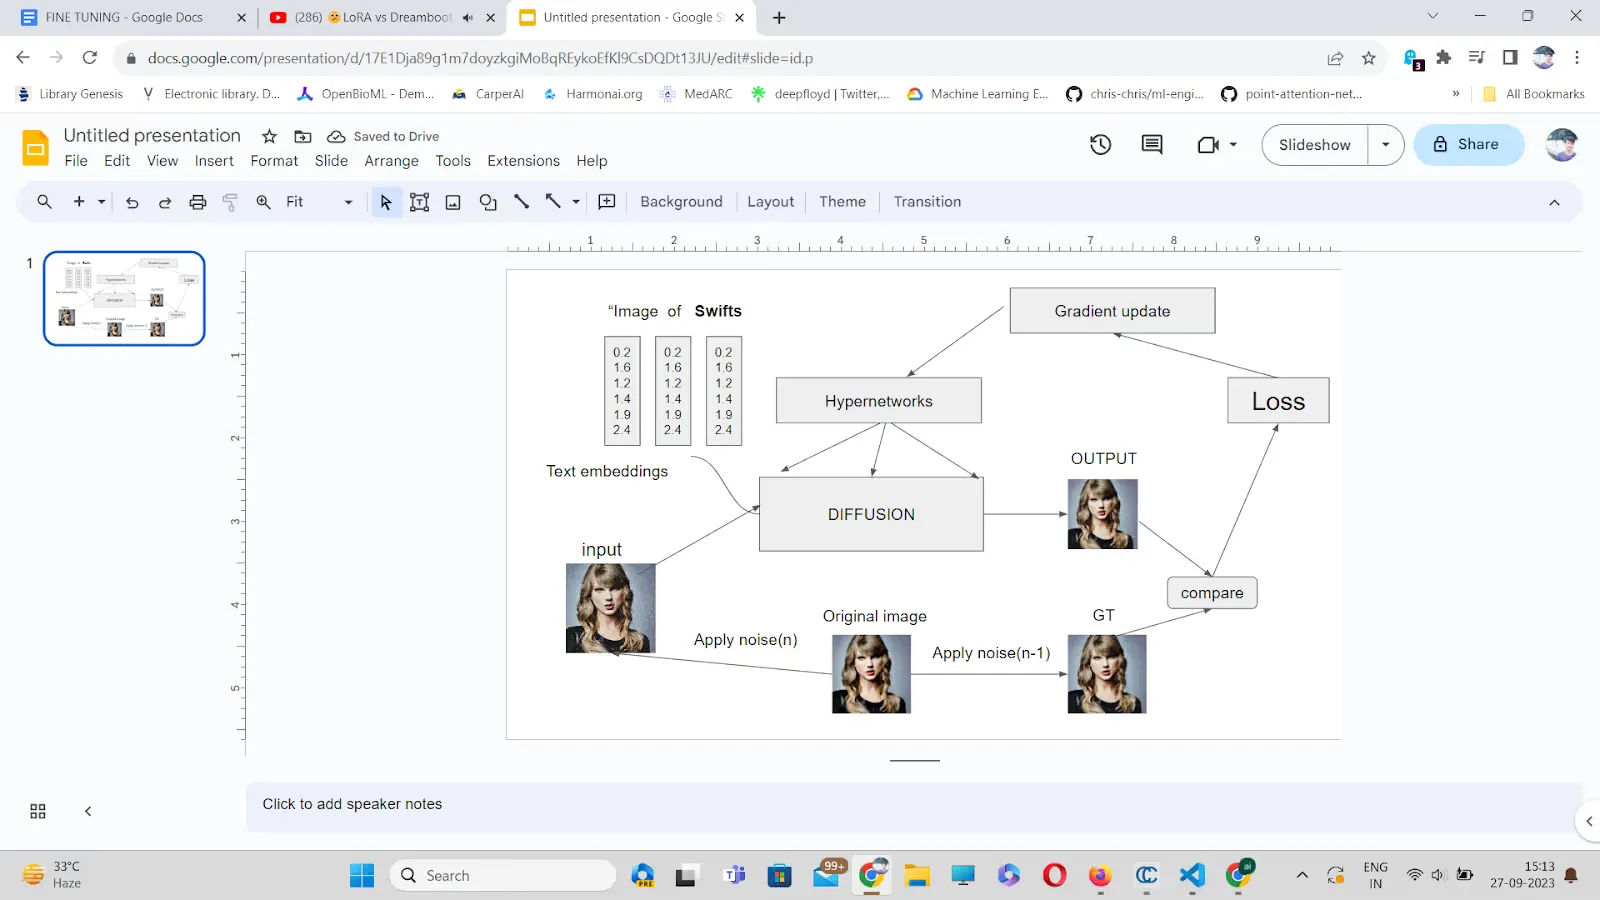
The aim was to add a model that could add intermediate layers in the Stable Diffusion model for fine-tuning. The approach hasn’t gained popularity yet due to time complexity and overfitting issues.
Conclusion
So, the most effective techniques to fine-tune Stable Diffusion models are:
Dreambooth:
-
Basically fine-tuning the whole model with 3-5 images of a subject and updating the gradient of the pre-trained model continuously.
-
It is the most effective technique due to its lesser ability to overfit and language drift.
-
It is storage inefficient as the whole model weights have to be stored.
Textual Inversion:
-
Fine-tuning the model such that the gradient gets updated for the text embedding and captures text-image relationship directly without interfering with the model weights.
-
Output weights are a tiny embedding.
-
It has a fainter idea due to fixed weights, while Dreambooth has a better idea.
LORA:
-
Taking intermediate layers to train in order to update only intermediate layer weights.
-
It is the quickest to train.
-
It shows excellent results for 20-30 images as it requires less VRAM to train.
-
When there’s a situation of training 1000+ images, Dreambooth is a better option because it’s difficult to set parameters for LORA.


-Feature-Image.CjBFdO7y_Z1JlSjK.webp)