
Semantic search takes a fundamentally different approach from traditional keyword-based methods. Instead of relying on exact keyword matching, it aims to capture the meaning behind a query and retrieve the most relevant results from documents. This is made possible through vector embeddings—numerical representations of text derived from trained embedding models. Two pieces of text with similar meaning will have embeddings that are close together in vector space, even if their wording is different.
Qdrant, one of the leading open-source vector databases (documentation), allows us to:
- Ingest embeddings generated by models such as OpenAI’s.
- Store these embeddings along with their metadata (called payload) in collections.
- Perform semantic search by comparing query embeddings with stored vectors using similarity metrics (e.g., cosine similarity or dot product).
While semantic search is powerful, there are situations, especially in ecommerce, where users need more control. For example, a shopper might only want products from a specific brand or within a certain price range. Pure semantic search alone often leads to lower precision in such cases.
Qdrant solves this by supporting hybrid search—combining semantic search with structured filtering based on payload fields. In the ecommerce use case, this allows you to filter results by attributes like brand, category, or price.
When combined with Agentic AI—which acts as an intelligent assistant that translates natural-language queries into structured filters—this approach delivers a vastly better search experience.
In this article, we’ll cover how to:
- Generate document embeddings.
- Ingest them into Qdrant.
- Build a semantic search engine with Agentic AI.
- Wrap everything in a simple conversational UI using Streamlit.
To keep things readable, I’ll show simplified code for each step. For the complete implementation, including logging and error handling, check out the full repository here:: Github agentic-ai-qdrant.
Set Up the Environment
Before we dive in, let’s prepare a few prerequisites.
We’ll be working in Python. Let’s assume you already have it installed. If not, you can download it from python.org.
We’ll use Docker to run a local instance of Qdrant. If you don’t have Docker installed, follow the instructions on the Docker documentation to get started.
You’ll need an OpenAI API key for two purposes:
- To generate vector embeddings using the OpenAI embedding model.
- To power the shopping assistant with an OpenAI LLM.
You can generate your API key from OpenAI’s API Keys page.
Now, let’s set up the project directory. We’ll name it agentic-ecommerce, and the structure will look like this:
agentic-ecommerce/
├── dataset/
├── embeddings/
├── logs/
├── pages/
└── src/
To create this folder structure, run the following command in your terminal:
mkdir dataset embeddings logs pages src
The dataset folder will store the raw product catalog. For this project, we’ve generated a fake dataset of 100 diverse clothing products using Claude Sonnet to simulate a realistic e-commerce catalog. Each product entry includes:
- Categories: Dresses, pants, shirts, sweaters, t-shirts, skirts, jackets
- Brands: Zara, Levi’s, H&M, Uniqlo, Adidas
- Price range: $12.99 – $149.99
- Details: Materials, sizes, colors, descriptions
- URL: A demo link to simulate actual ecommerce experience
Here’s a sample product entry:
{
   "id": 1,
   "name": "Cotton Summer Dress",
   "category": "dresses",
   "brand": "Zara",
   "color": "Blue",
   "size": [
     "XS",
     "S",
     "M",
     "L",
     "XL"
   ],
   "material": "100% Cotton",
   "price": 45.75,
   "description": "Lightweight and breathable cotton dress perfect for warm weather. Features floral print, comfortable A-line fit, and knee-length design. Machine washable and wrinkle-resistant.",
   "url": "http://localhost:8501/Product_Catalog?product_id=1"
 },
You can download the dataset from the GitHub repository: product_catalog.json. Save this file in the dataset/ folder.
Next, from the main project directory, create a file named requirements.txt to list all the Python libraries we’ll use:
pandas
python-dotenv
pydantic
openai
openai-agents
qdrant-client
streamlit
We’ll also need an environment variables file named .env to securely store the OpenAI API key. Create a .env file in the root directory and add the following line:
# OpenAI API Configuration
OPENAI_API_KEY=your_actual_openai_api_key_here
As a best practice, let’s create an isolated virtual environment so this project doesn’t interfere with others. Run the following commands in your terminal:
python −m venv venv
source venv/bin/activate      # On Windows: venv\Scripts\activate
pip install -r requirements.txt
- The first command creates a virtual environment named venv.
- The second command activates it (use the appropriate command for your operating system).
- The third command installs all the dependencies listed in requirements.txt.
Now your environment is fully set up, and we’re ready to dive into the code.
Getting Started with Qdrant
We’ll follow the official Local Quickstart - Qdrant to run Qdrant in a local environment. First, make sure Docker (installed as per the prerequisites) is running.
Start by downloading the Qdrant image from Docker Hub:
docker pull qdrant/qdrant
This may take a few minutes. Once it’s done, start the Qdrant service:
docker run -p 6333:6333 -p 6334:6334 \
    -v "$(pwd)/qdrant_storage:/qdrant/storage:z" \
    qdrant/qdrant
After running this:
- A new folder named qdrant_storage/ will be created in your project directory to store Qdrant’s configuration and data.
- Keep this terminal window open, as it hosts the running Qdrant instance.
For the next steps, open a new terminal, navigate to your project directory, and activate your virtual environment.
You can now access the Qdrant Dashboard UI at http://localhost:6333.
Generating Embeddings
As mentioned in the introduction, Qdrant’s vector search works with embeddings—high-dimensional vectors representing the meaning of text, images, or other data formats.
For instance, in vector space:
- “king” and “queen” will have embeddings that are close together.
- “king” and “car” will be farther apart.
For this project, we’ll use OpenAI’s text-embedding-3-small model to generate text embeddings.
Create a new Python script inside the src/ folder and name it embed_products.py. This script will load the product dataset and generate embeddings for each product entry in the catalog.
First, import the necessary packages:
import pandas as pd
import numpy as np
import openai

import os
from dotenv import load_dotenv
Next, we will initialize an OpenAI client. But before that, we need to load the environment variables that we stored in the ‘.env’ file.
# Load environment variables
load_dotenv()

# Initialize OpenAI client
openai_api_key = os.getenv("OPENAI_API_KEY")
openai_client = openai.Client(api_key=openai_api_key)
print(f"Loaded dataset with {len(df)} products.")
Now, let’s load the dataset and prepare the texts for embedding:
# Load dataset
dataset_path = "dataset/product_catalog.json"
df = pd.read_json(dataset_path)
print(f"Loaded dataset with {len(df)} products.")

# Prepare texts for embedding
texts = [f"{row.name}. {row.description} Material: {row.material}. Color: {row.color}." for row in df.itertuples()]
print(f"Number of texts to embed: {len(texts)}")
We load the dataset from a JSON file and store it as a DataFrame. From there, we prepare the text input required for generating embeddings. The text for each product is constructed using the following attributes: product name, description, material, and available colors.
For example, the first product in the list might generate the following text:
“Cotton Summer Dress. Lightweight and breathable cotton dress perfect for warm weather. Features floral print, comfortable A-line fit, and knee-length design. Machine washable and wrinkle-resistant. Material: 100% Cotton. Color: Blue.”
Once we’ve constructed these texts, we proceed to the core part of the embedding process—generating embeddings using the OpenAI model.
# Generate embeddings
embedding_model = "text-embedding-3-small"
response = openai_client.embeddings.create(input=texts, model=embedding_model)
print(f"Generated {len(response.data)} embeddings.")

# Extract embeddings and convert to numpy array
embeddings = [item.embedding for item in response.data]
vectors = np.array(embeddings)
print(f"Shape of embedding vectors: {vectors.shape}")

# Save embeddings to file
embedding_file_path = "embeddings/product_catalog.npy"
np.save(embedding_file_path, vectors, allow_pickle=False)
print(f"Embeddings saved to {embedding_file_path}.")
First, we specify the embedding model—text-embedding-3-small from OpenAI—as discussed earlier. We then call the OpenAI API by sending all product texts in a single batch, which returns the corresponding embeddings.
Next, we extract the embeddings from the API response and convert them into a NumPy array. Since we’re using text-embedding-3-small, each embedding is a 1536-dimensional vector. (Note: other models may produce vectors of different dimensions.)
Finally, we save the resulting array as a .npy file in the embeddings/ directory for later use.
Run the script with the following command:
python src/embed_products.py
If everything runs successfully, your terminal output should look like this:
>> OpenAI client initialized.
>> Loaded dataset with 100 products.
>> Number of texts to embed: 100
>> Generated 100 embeddings.
>> Shape of embedding vectors: (100, 1536)
>> Embeddings saved to embeddings/product_catalog.npy.
Now that we’ve successfully transformed the product texts into numerical representations (embeddings), the next step is to store them in Qdrant so we can perform semantic search on the product catalog.
To do this, create a new Python script in the src/ directory named ingest_embeddings.py.
As usual, start by importing the necessary libraries. Since this script only interacts with Qdrant, there’s no need to import the OpenAI package. Then, initialize the Qdrant client by connecting it to the local Qdrant instance running on port 6333 (as configured in the earlier setup step).
from qdrant_client import QdrantClient, models
import pandas as pd
import numpy as np
from uuid import uuid4
import time

# Initialize Qdrant client
qdrant_url = "http://localhost:6333"
client = QdrantClient(url=qdrant_url, timeout=60.0)
print("Qdrant client initialized.")
Next, we’ll load both the original dataset and the embeddings generated in the previous step. We’ll also extract the vector dimension—which, in our case, is 1536—as it will be needed when creating the Qdrant collection.
# Load dataset
dataset_path = "dataset/product_catalog.json"
df = pd.read_json(dataset_path)
print(f"Loaded dataset with {len(df)} products.")

# Load embeddings from file
embedding_file_path = "embeddings/product_catalog.npy"
vectors = np.load(embedding_file_path)
vector_dimension = vectors.shape[1]
print(f"Loaded embeddings with shape: {vectors.shape}")
In Qdrant, each vector is stored along with its payload—in our case, the metadata such as name, description, price, and other product attributes—as a point. A group of these points is stored within a collection (see Collections - Qdrant).
When creating a collection, we need to specify:
- The vector dimension (based on the embedding model used).
- The distance metric used to measure similarity between vectors (we’ll use Cosine similarity for this project).
To store our product catalog, we first check whether a collection with the same name already exists and remove it if needed to avoid conflicts.
Next, we create a new collection, specifying the vector size and similarity metric. In this step, we also include error handling to manage potential timeouts during the creation process.
You’ll find the complete script to create the product_catalog collection below.
qdrant_collection_name = "product_catalog"

# Check if collection exists and delete if it does
if client.collection_exists(qdrant_collection_name):
   print(f"Collection '{qdrant_collection_name}' already exists.")
   client.delete_collection(qdrant_collection_name)
   print(f"Deleted existing collection '{qdrant_collection_name}'.")

# Create a new collection
try:
   client.create_collection(
       collection_name=qdrant_collection_name,
       vectors_config=models.VectorParams(size=vector_dimension, distance=models.Distance.COSINE)
   )
   print(f"Created collection '{qdrant_collection_name}'.")
except Exception as ce:
   # Handle collection creation timeout
   if "timed out" in str(ce).lower():
       print("Timed out while creating collection. Polling for collection availability...")
       start_wait = time.time()
       while time.time() - start_wait < 60:
           try:
               if client.collection_exists(qdrant_collection_name):
                   print(f"Collection '{qdrant_collection_name}' is now available")
                   break
           except Exception as e:
               pass # Ignore errors while polling
           time.sleep(1)
       else:
           raise TimeoutError("Timed out waiting for collection to become available")
   else:
       raise
After successfully creating the collection, it’s time to store the points. As mentioned earlier, each point consists of a vector and its associated payload. To do this, we’ll construct the points using the embeddings and the original dataset as follows:
# Prepare points for insertion
points = []
for idx, (_, row) in enumerate(df.iterrows()):
   point = models.PointStruct(
       id=str(uuid4()),  # Generate unique ID
       vector=vectors[idx].tolist(),
       payload={
           "product_id": row["id"],
           "name": row["name"],
           "category": row["category"],
           "brand": row["brand"],
           "price": row["price"],
           "color": row["color"],
           "material": row["material"],
           "size": row["size"],
           "description": row["description"],
           "url": row["url"]
       }
   )
   points.append(point)
print(f"Prepared {len(points)} points for insertion.")
Now we have a set of points constructed from the embedding file and the associated metadata. The final part of this script involves inserting these points into the collection. We can use the following code to insert all the points in a single batch:
# Insert points into the collection
client.upsert(
   collection_name=qdrant_collection_name,
   points=points,
   wait=True  # Wait for the operation to complete
)

# Verify insertion by checking collection info
collection_info = client.get_collection(qdrant_collection_name)
points_count = collection_info.points_count
print(f"Inserted {points_count} points into collection '{qdrant_collection_name}'.")
Run the script with the following command:
python src/ingest_embeddings.py
If the collection is created successfully and all points are ingested, you should see output similar to the following in your terminal:
Created collection 'product_catalog'.
Prepared 100 points for insertion.
Inserted 100 points into collection 'product_catalog'.
Semantic Search
The main reason we transform data into vectors and store it in Qdrant is to enable semantic search on our product catalog. In this section, we’ll create a search engine function that performs semantic search based on a user’s natural language query.
This search engine will return a set of results most similar to the user query, sorted by relevance score. Later, we’ll also explore some limitations of this approach and discuss ways to improve accuracy.
First, let’s build a simple version of the semantic search engine. Create a new file named semantic_search.py inside the src/ folder. As usual, start by importing the necessary libraries and initializing two clients: the OpenAI client and the Qdrant client.
from qdrant_client import QdrantClient, models
import openai

import os
from dotenv import load_dotenv

# Load environment variables
load_dotenv()

# Initialize OpenAI client
openai_api_key = os.getenv("OPENAI_API_KEY")
openai_client = openai.Client(api_key=openai_api_key)
print("OpenAI client initialized.")

# Initialize Qdrant client
qdrant_url = "http://localhost:6333"
qdrant_client = QdrantClient(url=qdrant_url, timeout=60.0)
print("Qdrant client initialized.")
Next, we’ll define the search engine function, which follows a three-step workflow:
- Transform the user query into an embedding.
- Perform a vector similarity search in Qdrant.
- Process and return the results.
We’ll wrap these steps in a function called search_product, which takes the following parameters:
- query: the user’s query text
- top_k: the maximum number of results to return
score_threshold: the minimum similarity score required for a result to be included
def search_product(query, top_k=5, score_threshold=0.2):
   # Get query embedding
   embedding_model = "text-embedding-3-small"
   response = openai_client.embeddings.create(input=query, model=embedding_model)
   query_vector = response.data[0].embedding
   print(f"Generated query embedding with shape: {len(query_vector)}")

   # Search in Qdrant collection
   collection_name = "product_catalog"
   results = qdrant_client.query_points(
       collection_name=collection_name,
       query=query_vector,
       limit=top_k,
       score_threshold=score_threshold,
       with_payload=True
   ).points
   print(f"Found {len(results)} results for query '{query}'.")

   # Process results
   processed_results = [
       {
           'score': result.score,
           'name': result.payload['name'],
           'brand': result.payload['brand'],
           'price': result.payload['price'],
           'color': result.payload['color'],
           'size': result.payload['size'],
           'description': result.payload['description'],
           'category': result.payload['category'],
           'material': result.payload['material'],
           'url': result.payload['url']
       }
       for result in results
   ]
   print(f"Processed {len(processed_results)} results.")

   return processed_results
In the first step, we transform the user’s query into an embedding using the same model we previously applied to the product catalog. Since this is a single query, we simply take the first item in the response as the query vector.
The second step is performing the vector search in the Qdrant database using this query vector. We’ll use the query_points endpoint and configure five parameters:
- collection name
- query
- limit (set from the top_k parameter)
- score_threshold
- with_payload (set to True so that results include the full payload/metadata—in our case, the complete product attributes)
The final step is to extract the results and return them as clean, structured data.
At this point, we have our semantic search engine function ready. This script can later be imported and reused as a module in other scripts. However, before moving on to app development, we’ll add an entry point to test it—so the function runs when the script is executed directly (rather than imported as a module).
if __name__ == "__main__":
   query = "casual jacket H&M"
   top_k = 5
   score_threshold = 0.2

   results = search_product(query, top_k, score_threshold)
   for i, result in enumerate(results, 1):
       print(f"{i}. {result['name']} ({result['brand']}) - ${result['price']} - Score: {result['score']:.3f}")
   if not results:
       print("No products matched the search criteria.")
By adding this code at the end of the file, we can run the search_product function with the example query “warm clothes for winter”, setting the top_k parameter to 5 and the minimum score to 0.2. You can experiment with different inputs, but for now, let’s run the script and review the results.
Run the following command in your terminal:
python src/search_product.py
If the script runs successfully, you should see results similar to the output below. Notice how the results capture intent rather than just keywords—showing the advantage of semantic search:
Pea Coat (Zara) - $129.95 - Score: 0.380
Description: Classic pea coat with double-breasted closure and tailored fit. Features wool blend fabric and timeless nautical styling. Sophisticated outerwear for cold weather.
Material: 80% Wool, 20% Polyester - Color: Camel

Puffer Jacket (Uniqlo) - $79.99 - Score: 0.377
Description: Lightweight puffer jacket with down filling. Features hood and multiple pockets. Warm and practical for cold weather conditions.
Material: Nylon - Color: Black

Turtleneck Sweater (Uniqlo) - $39.99 - Score: 0.369
Description: Cozy turtleneck sweater with fitted silhouette. Features ribbed collar and cuffs. Versatile piece for layering or standalone wear.
Material: Wool Blend - Color: Black

Sweater Dress (Uniqlo) - $99.90 - Score: 0.360
Description: Luxurious sweater dress with turtleneck and midi length. Features cashmere blend fabric and body-skimming fit. Elegant piece for sophisticated cold-weather styling.
Material: 70% Wool, 30% Cashmere - Color: Gray

Wool Pullover Sweater (Uniqlo) - $89.99 - Score: 0.359
Description: Cozy merino wool sweater with crew neckline and ribbed cuffs. Soft and warm for cooler weather. Features classic fit and natural odor resistance.
Material: 100% Merino Wool - Color: Gray
Although our query only mentioned “warm clothes for winter”, the search engine successfully returned results that are semantically related to the concept of warm clothing and winter wear. For example, the first and second results don’t explicitly include the words “warm clothes” or “winter”, but instead reference “cold weather”.
This demonstrates the strength of semantic search—it can capture meaning even when exact keywords are missing. The results can be considered quite good, especially given that the query was fairly generic.
However, when the query becomes more specific—such as filtering by brand, price range, or category—this method alone may not always produce accurate matches. For example, consider the query: “warm clothes for winter from H&M”. The results include mostly Uniqlo and Zara products, with only one H&M item appearing lower in the ranking:
Turtleneck Sweater (Uniqlo) - $39.99 - Score: 0.400
Description: Cozy turtleneck sweater with fitted silhouette. Features ribbed collar and cuffs. Versatile piece for layering and standalone wear.
Material: Wool Blend - Color: Black

Sweater Dress (Uniqlo) - $99.90 - Score: 0.393
Description: Luxurious sweater dress with turtleneck and midi length. Features cashmere blend fabric and body-skimming fit. Elegant piece for sophisticated cold-weather styling.
Material: 70% Wool, 30% Cashmere - Color: Gray

Puffer Jacket (Uniqlo) - $79.99 - Score: 0.378
Description: Lightweight puffer jacket with down filling. Features hood and multiple pockets. Warm and practical for cold weather conditions.
Material: Nylon - Color: Black

Pea Coat (Zara) - $129.95 - Score: 0.366
Description: Classic pea coat with double-breasted closure and tailored fit. Features wool blend fabric and timeless nautical styling. Sophisticated outerwear for cold weather.
Material: 80% Wool, 20% Polyester - Color: Camel

Hoodie (H&M) - $35.99 - Score: 0.355
Description: Cozy hoodie with kangaroo pocket. Features drawstring hood and ribbed cuffs. Comfortable and casual for everyday wear.
Material: Cotton Fleece - Color: Blue
Interestingly, the only H&M item in the list appears at the very bottom, while the rest are from other brands. To improve accuracy in such cases, we can use the query_filter parameter in query_points.
Semantic Search with Filters
A query filter works by filtering a point’s payload based on specified conditions, and then Qdrant applies vector search on the remaining points to find the nearest matches (see Filtering - Qdrant).
Let’s modify our current script to enable query filters.
- First, update the search_product function to include a new parameter called filters, with a default value of None.
- Second, update the query_points call by adding the query_filter parameter.
def search_product(query, top_k=5, score_threshold=0.2, filters=None):
   # Get query embedding
   ...

   # Search in Qdrant collection
   collection_name = "product_catalog"
   results = qdrant_client.query_points(
       collection_name=collection_name,
       query=query_vector,
       limit=top_k,
       score_threshold=score_threshold,
       with_payload=True,
       query_filter=models.Filter(
           must=[
               models.FieldCondition(
                   key="brand",
                   match=models.MatchValue(value=filters['brand'])
               ),
               models.FieldCondition(
                   key="category",
                   match=models.MatchValue(value=filters['category'])
               ),
               models.FieldCondition(
                   key="price",
                   range=models.Range(
                       gte=filters['price_min']
                   )
               ),
               models.FieldCondition(
                   key="price",
                   range=models.Range(
                       lte=filters['price_max']
                   )
               ),
           ]
       )
   ).points
   print(f"Found {len(results)} results for query '{query}'.")
In this script, we’ll use four conditions from our payload: brand, category, minimum price, and maximum price.
- For brand and category, we’ll use models.MatchValue, which requires an exact match with the input.
- For minimum and maximum price, we’ll use models.Range: the minimum price is defined with GTE (greater than or equal), and the maximum price with LTE (lower than or equal).
The final part to modify is the run example section of the script.
if __name__ == "__main__":
   query = "warm clothes for winter"
   top_k = 5
   score_threshold = 0.2
   filters = {
       'brand': 'H&M',
       'category': 'sweaters',
       'price_min': 10,
       'price_max': 100
   }

   results = search_product(query, top_k, score_threshold, filters)
   for i, result in enumerate(results, 1):
       print(f"{i}. {result['name']} ({result['brand']}) - ${result['price']} - Score: {result['score']:.3f} - Description: {result['description']} - Material: {result['material']} - Color: {result['color']}")
   if not results:
       print("No products matched the search criteria.")
Since we are now using filter conditions for our vector search, let’s demonstrate this by adding the conditions as a filters dictionary. We’ll keep the semantic query as “warm clothes for winter”, but add the following filters:
- Brand: only H&M
- Category: only sweaters
- Price range: between $10 and $100
Running the script with these filters returns the following results:
Oversized Sweater (H&M) - $39.99 - Score: 0.308
Description: Cozy oversized sweater with dropped shoulders and relaxed fit. Features ribbed trim and soft texture. Perfect for comfortable and trendy styling.
Material: 60% Cotton, 40% Acrylic - Color: Mustard

Hoodie (H&M) - $35.99 - Score: 0.306
Description: Cozy hoodie with kangaroo pocket. Features drawstring hood and ribbed cuffs. Comfortable and casual for everyday wear.
Material: Cotton Fleece - Color: Blue

Knit Sweater (H&M) - $29.99 - Score: 0.297
Description: Soft knit sweater with textured pattern. Features round neckline and dropped shoulders. Comfortable and cozy for everyday wear.
Material: Acrylic Blend - Color: Cream

Zip-Up Hoodie (H&M) - $44.99 - Score: 0.286
Description: Classic zip-up hoodie with kangaroo pocket and adjustable drawstring hood. Features brushed fleece interior for extra warmth and comfort.
Material: 80% Cotton, 20% Polyester - Color: Navy

Mohair Sweater (H&M) - $49.99 - Score: 0.265
Description: Soft mohair blend sweater with fuzzy texture and cropped length. Features crew neckline and relaxed fit. Cozy and trendy piece for layering or standalone wear.
Material: 30% Mohair, 70% Acrylic - Color: Lilac
Unlike our first attempt—where the results included multiple brands related to the semantic query—using filters ensures that we only retrieve H&M items within the specified category and price range.
This demonstrates how adding filters can significantly improve the precision of the search engine, especially when a user’s query includes specific conditions.
Adaptable Filter
The previous code assumed that the user would always provide all filters (brand, category, minimum price, and maximum price). In reality, filter inputs are unpredictable—a user might specify only the brand, skip the category or price range, or sometimes provide no filters at all.
To handle this, we need to adjust the script so it doesn’t break and can accept any combination of filter conditions specified by the user. Instead of passing a fixed input to the query_filter parameter, we’ll build a dynamic set of conditions that can adapt to the provided filters.
To achieve this, we’ll create a new helper function called build_filter_conditions, which takes the user’s filters as input. This function prepares the filter conditions dynamically, based on which fields are available, before passing them into query_points.
def build_filter_conditions(filters):
   """Build Qdrant filter conditions from user input."""
   filter_conditions = []

   if 'brand' in filters:
       filter_conditions.append(models.FieldCondition(
           key='brand',
           match=models.MatchValue(value=filters['brand'])
       ))
   if 'category' in filters:
       filter_conditions.append(models.FieldCondition(
           key='category',
           match=models.MatchValue(value=filters['category'])
       ))
   if 'price_min' in filters:
       filter_conditions.append(models.FieldCondition(
           key='price',
           range=models.Range(gte=filters['price_min'])
       ))
   if 'price_max' in filters:
       filter_conditions.append(models.FieldCondition(
           key='price',
           range=models.Range(lte=filters['price_max'])
       ))

   result = models.Filter(must=filter_conditions) if filter_conditions else None
   return result
Next, we need to modify the search_product function so that it uses the filters generated by the build_filter_conditions function.
def search_product(query, top_k=5, score_threshold=0.2, filters=None):
   # Get query embedding
   embedding_model = "text-embedding-3-small"
   response = openai_client.embeddings.create(input=query, model=embedding_model)
   query_vector = response.data[0].embedding
   print(f"Generated query embedding with shape: {len(query_vector)}")

   filter_conditions = None
   if filters:
       filter_conditions = build_filter_conditions(filters)

   # Search in Qdrant collection
   collection_name = "product_catalog"
   results = qdrant_client.query_points(
       collection_name=collection_name,
       query=query_vector,
       limit=top_k,
       score_threshold=score_threshold,
       with_payload=True,
       query_filter=filter_conditions
   ).points
   print(f"Found {len(results)} results for query '{query}'.")

   # Process results
   processed_results = [
       {
           'score': result.score,
           'name': result.payload['name'],
           'brand': result.payload['brand'],
           'price': result.payload['price'],
           'color': result.payload['color'],
           'size': result.payload['size'],
           'description': result.payload['description'],
           'category': result.payload['category'],
           'material': result.payload['material']
       }
       for result in results
   ]
   print(f"Processed {len(processed_results)} results.")

   return processed_results
Now the script can adapt to the user’s input—whether all filter conditions are provided, only some, or none at all. You can experiment with different examples to see how it behaves.
Build AI Agent Using OpenAI Agents SDK
Now we move on to integrating our search function with an AI agent. This agent will help users find items that best match their queries using the search_product function. Beyond retrieving results, it will also present them in a friendly, conversational manner and keep the dialogue going until the user finds the most suitable item.
A key characteristic of an AI agent is its ability to use tools. Tools can include retrieving data from internal or external sources, performing web searches, or calling functions. In our case, we’ll provide the agent with access to our semantic search function so it can query the internal product catalog.
There are many AI agent frameworks available, but for this tutorial, we’ll use the OpenAI Agents SDK. For more details, you can refer to the official OpenAI Agents SDK.
Let’s create a new script in the src/ directory named shopping_agent.py. First, we’ll import the required libraries and load the environment variables. By default, the Agents SDK will use the OpenAI API key already stored in your .env file.
from agents import Agent, Runner, function_tool
from pydantic import BaseModel, Field
from typing import Literal, Optional

import sys
import os
sys.path.append(os.path.dirname(os.path.dirname(os.path.abspath(__file__))))
from src.semantic_search import search_product

from dotenv import load_dotenv

# Load environment variables
load_dotenv()
The first library we’ll import is agents, including the modules Agent, Runner, and function_tool. These will be used to initialize and run the agent, as well as to define tools the agent can use.
Next, we’ll import pydantic and typing, which will help us define data structures and perform input validation. After that, we’ll import the search_product function from the src/semantic_search script.
Since the filter condition input is structured, we need to define an input model for it. Using pydantic and typing, we can create a validated schema. The benefit of defining this schema is that it allows the agent to understand the expected input format. For example, if we have a predefined list of brands, the schema ensures that the input for the brand filter can only be one of the allowed values.
# Define the input model for query filters
class QueryFilters(BaseModel):
   brand: Optional[Literal["Zara", "Levi's", "H&M", "Uniqlo", "Adidas"]] = Field(None, description="Filter by brand")
   category: Optional[Literal["dresses", "pants", "shirts", "sweaters", "t-shirts", "skirts", "jackets"]] = Field(None, description="Filter by category")
   price_min: Optional[float] = Field(None, description="Minimum price filter")
   price_max: Optional[float] = Field(None, description="Maximum price filter")
Next, we’ll define the search function for Qdrant, which will leverage the search_product function we built earlier. This new function, search_qdrant, acts as the bridge between the AI agent and the semantic search system. By decorating it with @function_tool, we make it accessible for the agent to call as a tool.
# Search function for Qdrant
@function_tool
def search_qdrant(query: str, filters: QueryFilters = QueryFilters(), top_k: int = 5, score_threshold: float = 0.2) -> list:
   """
   Search for clothing products based on a natural language query.

   Args:
       query (str): The search query.
       filters (QueryFilters): Optional filters for brand, category, price range, etc.
       top_k (int): Number of results to return.
       score_threshold (float): Minimum similarity score to include in results.
   Returns:
       list: List of matching products with details.
   """

   # Convert QueryFilters to dictionary, excluding None values
   filters_dict = filters.model_dump(exclude_none=True)

   try:
       results = search_product(query=query, top_k=top_k, score_threshold=score_threshold, filters=filters_dict)
       return results
   except Exception as e:
       raise
This function accepts a natural language query string, optional filters as a QueryFilters object, the number of results to return (top_k), and a similarity score threshold. It converts the Pydantic model into a dictionary using model_dump(exclude_none=True), which removes any unset filter values, and then calls the underlying search_productfunction. The function also includes error handling to manage any exceptions that may occur during the search process.
The agent itself will be defined as an expert shopping assistant, with clear instructions to help users find suitable clothing items based on their queries. We’ll also ensure that this agent uses the tool we defined earlier, search_qdrant, for semantic search.
# Define the shopping agent
shopping_agent = Agent(
   name="Shopping Agent",
   instructions="""You are an expert shopping assistant specializing in clothing and fashion. Your role is to help users find the perfect clothing items based on their needs and preferences.

When helping users:
1. Ask clarifying questions if their request is vague (e.g., occasion, size, budget, style preferences)
2. Use the search_qdrant tool to find relevant products based on their query
3. Present results in a friendly, organized manner with key details like price, brand, material, and colors
4. Provide styling suggestions or alternatives when appropriate
5. Help users compare different options based on their criteria

Available product categories: dresses, pants, shirts, sweaters, t-shirts, skirts, jackets
Available brands: Zara, Levi's, H&M, Uniqlo, Adidas

Be conversational, helpful, and focus on understanding what the user really wants to achieve with their clothing purchase.""",
   tools=[search_qdrant],
   tool_use_behavior="run_llm_again"
)

# Run the agent with user input
async def run_agent(user_input: str):
   try:
       result = await Runner.run(shopping_agent, user_input)
       return result.final_output
   except Exception as e:
       raise
Although we’ll build the conversational user interface shortly, we can already run this agent from the command line by adding the following entry point.
# Main entry point for running the agent
# This allows the agent to be run directly from the command line
if __name__ == "__main__":
   import asyncio
   user_query = input("Enter your search query: ")

   try:
       result = asyncio.run(run_agent(user_query))
       print(result)
   except Exception as e:
       print(f"Error: {str(e)}")
Run the agent with the following command:
python src/shopping_agent.py
The terminal will then prompt you to enter a search query. For example, if you want to find a sporty jacket under $80, you can type:
I want a sporty jacket under $80
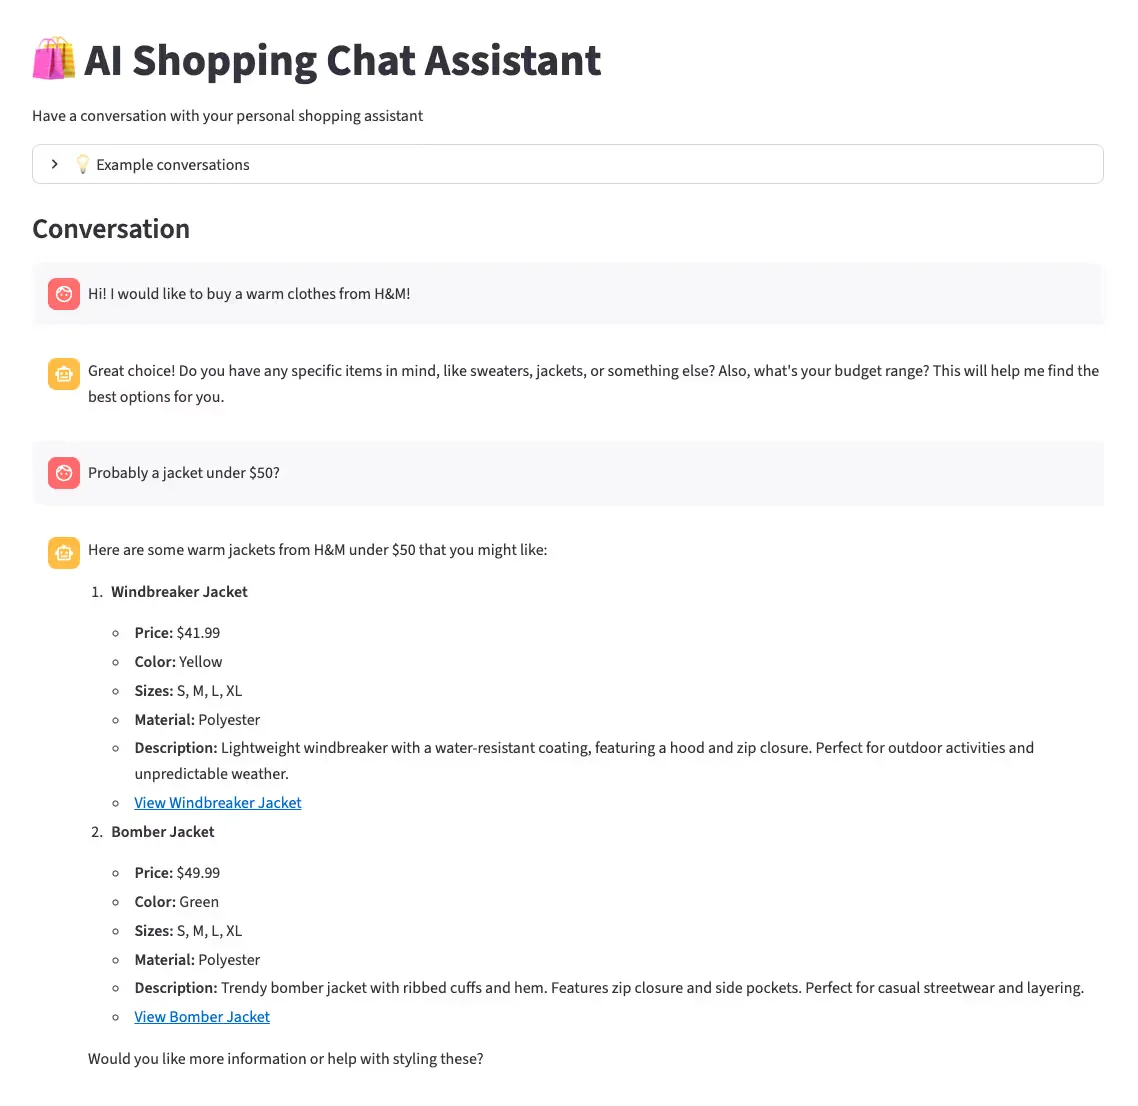
Build the Conversational UI Using Streamlit
To build a simple interface for interacting with the agent and exploring search results, we’ll use the Streamlit package (Streamlit documentation). Streamlit is an open-source Python library that makes it easy to develop lightweight web applications. It’s especially useful for showcasing projects or building prototypes quickly.
Below is the complete script that creates the chat interface. Save this script in the main project directory (not inside the src folder) with the name Main.py.
import streamlit as st
import asyncio
import time

import src.shopping_agent as shopping_agent

st.set_page_config(
   page_title="Shopping Chat Assistant",
   page_icon="🛍️",
   layout="wide"
)

# Initialize session state for chat history
if 'chat_history' not in st.session_state:
   st.session_state.chat_history = []
if 'is_processing' not in st.session_state:
   st.session_state.is_processing = False

# Header
st.title("🛍️ AI Shopping Chat Assistant")
st.markdown("Have a conversation with your personal shopping assistant")

# Example queries for inspiration
with st.expander("💡 Example conversations"):
   st.markdown("""
   - "I need a blue dress for a wedding"
   - "Show me comfortable jeans from Levi's"
   - "Looking for a warm winter sweater under $50"
   - "What about something in red instead?"
   - "Can you show me similar items but cheaper?"
   """)

# Display chat history
st.markdown("### Conversation")
chat_container = st.container()

with chat_container:
   if st.session_state.chat_history:
       for i, message in enumerate(st.session_state.chat_history):
           if message['role'] == 'user':
               with st.chat_message("user"):
                   st.write(message['content'])
           else:
               with st.chat_message("assistant"):
                   st.write(message['content'])
   else:
       st.markdown("*Start a conversation by typing your question below...*")

# Chat input
user_input = st.chat_input(
   "Ask me about clothing items...",
   disabled=st.session_state.is_processing
)

# Process new message
if user_input and not st.session_state.is_processing:
   # Add user message to chat history
   st.session_state.chat_history.append({
       'role': 'user',
       'content': user_input
   })

   # Set processing state
   st.session_state.is_processing = True

   # Display user message immediately
   with st.chat_message("user"):
       st.write(user_input)

   # Show typing indicator and process
   with st.chat_message("assistant"):
       with st.spinner("Thinking..."):
           try:
               # Create conversation context by joining recent messages
               conversation_context = ""
               if len(st.session_state.chat_history) > 1:
                   # Include last few messages for context
                   recent_messages = st.session_state.chat_history[-3:]  # Last 3 messages
                   for msg in recent_messages[:-1]:  # Exclude the current message
                       if msg['role'] == 'user':
                           conversation_context += f"User: {msg['content']}\n"
                       else:
                           conversation_context += f"Assistant: {msg['content']}\n"
                   conversation_context += f"User: {user_input}"
               else:
                   conversation_context = user_input

               # Run the async function with context
               result = asyncio.run(shopping_agent.run_agent(conversation_context))

               # Display assistant response
               st.write(result)

               # Add assistant response to chat history
               st.session_state.chat_history.append({
                   'role': 'assistant',
                   'content': result
               })
           except Exception as e:
               error_msg = f"An error occurred: {str(e)}"
               st.error(error_msg)
               st.session_state.chat_history.append({
                   'role': 'assistant',
                   'content': f"❌ {error_msg}"
               })

   # Reset processing state
   st.session_state.is_processing = False

   # Rerun to update the interface
   st.rerun()

# Footer
st.markdown("---")
st.markdown("*Powered by [OpenAI API](https://openai.com/) • [OpenAI Agents SDK](https://github.com/openai/openai-agents) • [Qdrant](https://qdrant.tech/) • [Streamlit](https://streamlit.io/)*")
The script uses session state to store conversation messages across page reloads and display them in a chat_container. Each time a user enters a message, it is appended to the chat history and passed as input to the AI agent (along with the most recent context). With this setup, users enjoy a smoother experience that combines the power of semantic search with conversational AI.
To start the interface, run the following command in your terminal:
streamlit run Main.py
This will open the interface in your default web browser.
Additional Product Catalog Page
To improve the user experience, we can let users browse products manually by creating a Product Catalog page that displays all items in one place.
Below is a simple script to configure this page. Save it as Product_Catalog.py inside the pages/ folder. Streamlit will automatically recognize it as part of a multipage app (Create a multipage app - Streamlit Docs).
import streamlit as st
import json

st.title("👗 Product Catalog")
st.write("Browse our collection of clothing products")

import src.config as CONFIG

# Load data
@st.cache_data
def load_products():
   try:
       with open(CONFIG.DATASET_PATH, 'r') as f:
           return json.load(f)
   except Exception as e:
       st.error(f"Error loading products: {e}")
       return []

products = load_products()

if not products:
   st.error("No products found.")
   st.stop()

# Simple search
search = st.text_input("Search products:", placeholder="Search by name or brand...")

# Filter products if search term provided
if search:
   products = [p for p in products if
               search.lower() in p['name'].lower() or
               search.lower() in p['brand'].lower()]

st.write(f"**{len(products)} products found**")

# Display products
for product in products:
   with st.container():
       col1, col2, col3 = st.columns([3, 1, 1])

       with col1:
           st.subheader(product['name'])
           st.write(f"*{product['brand']}* • {product['category'].title()}")
           st.write(product['description'])

       with col2:
           st.metric("Price", f"${product['price']:.2f}")
           st.write(f"**Color:** {product['color']}")
           st.write(f"**Material:** {product['material']}")

       with col3:
           st.write("**Available Sizes:**")
           st.write(", ".join(product['size']))

       st.markdown("---")
This page also serves as the target URL for each product, simulating the experience of a user clicking on a product link to view its details before making a purchase.
Conclusion
We have demonstrated how to build a semantic search engine powered by an AI agent framework to help users find the perfect product in a conversational way.
The process began with generating embeddings—numerical representations of product data—and ingesting them into Qdrant. We then built a semantic search engine and enhanced its precision by applying query filters.
By integrating this search engine into an AI agent, we enabled the agent to intelligently interpret user queries and convert them into effective search inputs. Finally, we wrapped everything in a simple Streamlit interface to showcase seamless interactions between users and the agent.
This project illustrates that combining semantic search with Qdrant and AI agents creates a far more engaging and accurate product discovery experience than traditional search methods, which rely only on exact keyword matches.
At Superteams.ai, we specialize in building production-grade AI systems like this—integrating semantic search, AI agents, and custom conversational interfaces tailored to your business. Whether you’re in e-commerce, SaaS, or any other industry, our expert teams can help you design and deploy intelligent assistants that transform customer experience and accelerate growth.
To learn more, speak to us


-Feature-Image.CjBFdO7y_Z1bTNvg.webp)