-Feature-Image.CjBFdO7y_Z2fFI8R.webp)
Manufacturing inspection is moving from rule-based systems to intelligent AI agents. Traditional approaches rely on fixed thresholds, handcrafted rules, or supervised models trained on limited defect data. These systems struggle in real-world environments where defects are rare, unpredictable, and constantly evolving.
AI agents can help with a more scalable approach. Instead of only classifying defects, they can observe video streams, compare patterns using embeddings, and make decisions based on similarity and context. This allows detection of both known and unknown defects in real time.
In this guide, you will build a defect detection AI agent that combines:
- Real-time detection using YOLO
- Semantic understanding using CLIP
- Vector search using Qdrant Edge
System Overview
The system is designed as a real-time pipeline that continuously processes video from the production line and makes decisions automatically. Each component has a clear role, and together they form an end-to-end AI agent for defect detection.
The pipeline used for this project is:
Camera Feed → YOLO → Embeddings (CLIP) → Qdrant Edge → Decision Agent- The camera feed captures live production data
- YOLO is then used to identify regions of interest (areas where defects may occur)
- These regions are then converted into embeddings using CLIP
- The embeddings are then stored and queried in Qdrant Edge (vector database)
- The decision agent then uses similarity scores to classify the type of defect
This system follows an edge-first design, meaning all processing happens locally on devices like NVIDIA Jetson or industrial GPUs. This ensures low latency, reduces bandwidth usage, and enables real-time decisions.
For higher performance or multi-camera setups, DeepStream can be added as an optimization layer to handle video decoding and GPU inference more efficiently.
You can also extend this with an edge-to-cloud loop. Where the system detects uncertain or critical anomalies, it can send selected samples to the cloud for re-evaluation and model updates, enabling continuous improvement over time.
Step 1: Setting Up the Environment
Before starting, we need to first install the required libraries and download the dataset from mvtec-ad.
Run the following command in your Jupyter notebook:
!pip install ultralytics opencv-python pillow torch torchvision tqdm
!pip install fastembed qdrant-edge-py
!pip install kaggle
!kaggle datasets download -d ipythonx/mvtec-ad --unzip -p mvtec_anomaly_detection
Step 2: Importing Libraries and Initializing GPU
Next, we’ll import the necessary libraries and initialize the GPU if available:
import os
import cv2
import numpy as np
import torch
from PIL import Image
from pathlib import Path
from ultralytics import YOLO
import matplotlib
matplotlib.use('Agg')
import matplotlib.pyplot as plt
from tqdm import tqdm
import yaml
import shutil
import uuid
from fastembed import ImageEmbedding, TextEmbedding
from qdrant_edge import (Distance, EdgeConfig, EdgeShard, EdgeVectorParams,
                         Point, UpdateOperation, Query, QueryRequest)

device = "cuda" if torch.cuda.is_available() else "cpu"
print(f"Using device: {device}")
%matplotlib inline
Step 3: Preparing the Datasets
3.1 Setting Up Directories for YOLO Format
We start by creating directories for the whole converted dataset for YOLO training.
MVTEC_ROOT = "mvtec_anomaly_detection/leather"
YOLO_DATASET_ROOT = "yolo_leather_dataset"

os.makedirs(f"{YOLO_DATASET_ROOT}/images/train", exist_ok=True)
os.makedirs(f"{YOLO_DATASET_ROOT}/images/val", exist_ok=True)
os.makedirs(f"{YOLO_DATASET_ROOT}/labels/train", exist_ok=True)
os.makedirs(f"{YOLO_DATASET_ROOT}/labels/val", exist_ok=True)

print("Dataset directories created")
3.2 Converting MVTec Annotations to YOLO Format
MVTec stores defect locations as binary mask images (white pixels = defect area) while YOLO expects normalized bounding box coordinates in a .txt file.
We need to write a function that handles this conversion for all 5 defect types:
def prepare_yolo_dataset():
    defect_types = ['color', 'cut', 'fold', 'glue', 'poke']
    train_count = 0
    val_count = 0

    for defect_type in defect_types:
        test_img_dir = f"{MVTEC_ROOT}/test/{defect_type}"
        gt_dir = f"{MVTEC_ROOT}/ground_truth/{defect_type}"

        if not os.path.exists(test_img_dir):
            continue

        images = sorted([f for f in os.listdir(test_img_dir) if f.endswith('.png')])

        for idx, img_name in enumerate(images):
            img_path = f"{test_img_dir}/{img_name}"
            mask_name = img_name.replace('.png', '_mask.png')
            mask_path = f"{gt_dir}/{mask_name}"

            img = cv2.imread(img_path)
            if img is None:
                continue

            h, w = img.shape[:2]
            split = 'train' if idx % 5 != 0 else 'val'

            new_img_name = f"{defect_type}_{img_name}"
            shutil.copy(img_path, f"{YOLO_DATASET_ROOT}/images/{split}/{new_img_name}")

            label_path = f"{YOLO_DATASET_ROOT}/labels/{split}/{new_img_name.replace('.png', '.txt')}"

            with open(label_path, 'w') as f:
                f.write(f"0 0.5 0.5 1.0 1.0\n")

                # Class 1: Defect - from mask
                if os.path.exists(mask_path):
                    defect_mask = cv2.imread(mask_path, cv2.IMREAD_GRAYSCALE)

                    if defect_mask is not None and np.sum(defect_mask) > 0:
                        contours, _ = cv2.findContours(
                            defect_mask, cv2.RETR_EXTERNAL, cv2.CHAIN_APPROX_SIMPLE
                        )
                        if len(contours) > 0:
                            largest = max(contours, key=cv2.contourArea)
                            x, y, bw, bh = cv2.boundingRect(largest)

                            center_x = (x + bw / 2) / w
                            center_y = (y + bh / 2) / h
                            norm_w = bw / w
                            norm_h = bh / h

                            f.write(f"1 {center_x:.6f} {center_y:.6f} {norm_w:.6f} {norm_h:.6f}\n")

            if split == 'train':
                train_count += 1
            else:
                val_count += 1

    return train_count, val_count


train_count, val_count = prepare_yolo_dataset()
dataset_config = {
    'path': os.path.abspath(YOLO_DATASET_ROOT),
    'train': 'images/train',
    'val': 'images/val',
    'names': {0: 'leather', 1: 'defect'}
}

config_path = f"{YOLO_DATASET_ROOT}/dataset.yaml"
with open(config_path, 'w') as f:
    yaml.dump(dataset_config, f)

print(f"Dataset config saved to {config_path}")
Step 4: Model Training and Loading
We can now use YOLOv8 Nano, the lightest YOLOv8 variant compatible with DeepStream, and train it on the dataset prepared in the previous step. After training finishes, we’ll load the best checkpoint for use in the detection pipeline.
model = YOLO('yolov8n.pt')

results = model.train(
    data=config_path,
    epochs=100,
    imgsz=640,
    batch=8,
    name='leather_defect_seg',
    patience=20,
    save=True,
    device=device,
    plots=True,

    hsv_h=0.015,
    hsv_s=0.7,
    hsv_v=0.4,
    degrees=10,
    translate=0.1,
    scale=0.2,
    flipud=0.5,
    fliplr=0.5,
    mosaic=1.0,

    optimizer='AdamW',
    lr0=0.001,
    lrf=0.01,
    momentum=0.937,
    weight_decay=0.0005,
    warmup_epochs=3,
)

print("\nTraining completed!")
trained_model_path = 'runs/detect/leather_defect_seg/weights/best.pt'
yolo_model = YOLO(trained_model_path)
print(f"Loaded YOLO model from {trained_model_path}")
Step 5: Setting Up Qdrant
Why Qdrant Edge?
Qdrant Edge is an embedded version of Qdrant that runs entirely on-device without needing a server or network connection. Instead of sending data to a remote database, it stores and queries vectors locally — making it ideal for edge deployments like factory inspection systems where low latency and offline operation matter.
In this step we initialize Qdrant Edge and load the FastEmbed CLIP models which will be used to power our similarity search. The vision encoder will be used to embed defect crop images into 512-dimensional vectors, which in turn will be used for classifying defects.
TEXT_MODEL_NAME = 'Qdrant/clip-ViT-B-32-text'
VISION_MODEL_NAME = 'Qdrant/clip-ViT-B-32-vision'
MODELS_DIR = "./qdrant-edge-directory/models"
SHARD_DIRECTORY = "./qdrant-edge-directory/shard"
VECTOR_DIMENSION = 512
VECTOR_NAME = "defect-vector"

print("Downloading FastEmbed models...")
ImageEmbedding(model_name=VISION_MODEL_NAME, cache_dir=MODELS_DIR)
TextEmbedding(model_name=TEXT_MODEL_NAME, cache_dir=MODELS_DIR)
print(f"Models cached in {MODELS_DIR}")

Path(SHARD_DIRECTORY).mkdir(parents=True, exist_ok=True)
config = EdgeConfig(
    vectors={
        VECTOR_NAME: EdgeVectorParams(
            size=VECTOR_DIMENSION,
            distance=Distance.Cosine,
        )
    }
)

edge_shard = EdgeShard.create(SHARD_DIRECTORY, config)
print("Qdrant Edge Shard initialized")

image_model = ImageEmbedding(
    model_name=VISION_MODEL_NAME,
    cache_dir=MODELS_DIR,
    local_files_only=True
)

text_model = TextEmbedding(
    model_name=TEXT_MODEL_NAME,
    cache_dir=MODELS_DIR,
    local_files_only=True
)
print("FastEmbed models loaded")
Step 6: Training CLIP for Classification
In this step we build the entire vector database for defect classification. We embed cropped defect regions and good leather samples using the CLIP (Contrastive Language-Image Pretraining) vision model and store them in the Qdrant Edge shard. At query time, the pipeline embeds an unknown crop and finds its nearest neighbors in this database to determine the defect type.
6.1 Creating Leather Mask
We first need a function that converts the image to mask and uses two thresholds to filter out very bright and very dark regions, leaving only the mid-range pixels that are similar to leather.
import glob

def create_leather_mask(image):
    h, w = image.shape[:2]
    gray = cv2.cvtColor(image, cv2.COLOR_BGR2GRAY)
    _, mask_bright = cv2.threshold(gray, 240, 255, cv2.THRESH_BINARY_INV)
    _, mask_dark = cv2.threshold(gray, 15, 255, cv2.THRESH_BINARY)

    leather_mask = cv2.bitwise_and(mask_bright, mask_dark)

    kernel = cv2.getStructuringElement(cv2.MORPH_RECT, (20, 20))
    leather_mask = cv2.morphologyEx(leather_mask, cv2.MORPH_CLOSE, kernel, iterations=3)
    leather_mask = cv2.morphologyEx(leather_mask, cv2.MORPH_OPEN, kernel, iterations=2)

    contours, hierarchy = cv2.findContours(
        leather_mask, cv2.RETR_CCOMP, cv2.CHAIN_APPROX_SIMPLE
    )
    for i in range(len(contours)):
        cv2.drawContours(leather_mask, contours, i, 255, -1)

    contours, _ = cv2.findContours(leather_mask, cv2.RETR_EXTERNAL, cv2.CHAIN_APPROX_SIMPLE)

    if len(contours) == 0:
        return None

    image_area = h * w
    valid_contours = [c for c in contours
                      if 0.30 * image_area < cv2.contourArea(c) < 0.90 * image_area]

    if len(valid_contours) == 0:
        valid_contours = [max(contours, key=cv2.contourArea)]

    final_mask = np.zeros_like(gray)
    cv2.drawContours(final_mask, valid_contours, -1, 255, -1)

    return final_mask
6.2 Extracting Defect Crop from Mask
For each defect type, we need to first read the test images and their corresponding ground truth masks and then crop the defect region with a small padding before embedding it.
def extract_defect_crop_from_mask(image, mask, padding_percent=7):
    contours, _ = cv2.findContours(mask, cv2.RETR_EXTERNAL, cv2.CHAIN_APPROX_SIMPLE)

    if len(contours) == 0:
        return None

    largest_contour = max(contours, key=cv2.contourArea)
    x, y, w, h = cv2.boundingRect(largest_contour)

    pad_x = int(w * padding_percent / 100)
    pad_y = int(h * padding_percent / 100)

    x1 = max(0, x - pad_x)
    y1 = max(0, y - pad_y)
    x2 = min(image.shape[1], x + w + pad_x)
    y2 = min(image.shape[0], y + h + pad_y)

    return image[y1:y2, x1:x2]
6.3 Embedding Defect Crops and Storing in Qdrant Edge
Now we can build the defect embedding database. For each of the 5 defect types we take up to 20 images, crop the defect region using the ground truth mask, and embed the crop with the CLIP vision model. Each embedding is stored as a Point in the shard with a payload to record the defect type and source paths.
defect_types = ['color', 'cut', 'fold', 'glue', 'poke']
image_points = []
total_images = 0
skipped_images = 0

for defect_type in defect_types:
    test_img_dir = f"{MVTEC_ROOT}/test/{defect_type}"
    gt_dir = f"{MVTEC_ROOT}/ground_truth/{defect_type}"

    if not os.path.exists(test_img_dir) or not os.path.exists(gt_dir):
        print(f"Skipping {defect_type} - directory not found")
        continue

    image_files = sorted([f for f in os.listdir(test_img_dir) if f.endswith('.png')])[:20]
    print(f"\nProcessing {defect_type} defects...")

    for img_name in tqdm(image_files, desc=f"  Embedding {defect_type}"):
        img_path = f"{test_img_dir}/{img_name}"
        mask_path = f"{gt_dir}/{img_name.replace('.png', '_mask.png')}"

        if not os.path.exists(mask_path):
            skipped_images += 1
            continue

        try:
            image = cv2.imread(img_path)
            mask = cv2.imread(mask_path, cv2.IMREAD_GRAYSCALE)

            if image is None or mask is None:
                skipped_images += 1
                continue

            defect_crop = extract_defect_crop_from_mask(image, mask, padding_percent=7)

            if defect_crop is None or defect_crop.size == 0:
                skipped_images += 1
                continue

            temp_crop_path = f"/tmp/defect_crop_{uuid.uuid4().hex[:8]}.jpg"
            cv2.imwrite(temp_crop_path, defect_crop)
            embeddings = list(image_model.embed([Path(temp_crop_path)]))[0]
            os.remove(temp_crop_path)

            image_points.append(Point(
                id=str(uuid.uuid4()),
                vector={VECTOR_NAME: embeddings.tolist()},
                payload={
                    "defect_type": defect_type,
                    "image_path": img_path,
                    "mask_path": mask_path,
                    "filename": img_name,
                    "crop_method": "ground_truth_mask",
                    "padding_percent": 7
                }
            ))
            total_images += 1

        except Exception as e:
            print(f"  Failed to process {img_name}: {e}")
            skipped_images += 1

edge_shard.update(UpdateOperation.upsert_points(image_points))
print(f"\nComplete Embedding Database Stored")
Step 7: Complete Detection and Classification Pipeline
In this step we build a complete detection and classification pipeline where YOLO detects defect regions in an image. Each detected crop is then classified using the Qdrant Edge embedding database and the results are visualized with bounding boxes and labels.
7.1 Detection Function with YOLO
The detection function passes the image through YOLO and looks only at boxes labeled as defects. Any box that is too small or covers more than half the image is ignored — those are usually noise. Each good detection gets cropped and sent to the classifier.
def detect_and_classify_defects(image_path, conf_threshold=0.15, iou_threshold=0.7):
    image = cv2.imread(image_path)
    if image is None:
        print(f"Error: Could not read image {image_path}")
        return None

    original_image = image.copy()

    results = yolo_model(image, conf=conf_threshold, iou=iou_threshold, verbose=False)
    defects = []

    for result in results:
        boxes = result.boxes.xyxy.cpu().numpy()
        confidences = result.boxes.conf.cpu().numpy()
        classes = result.boxes.cls.cpu().numpy()

        for box, conf, cls in zip(boxes, confidences, classes):
            if int(cls) != 1:
                continue

            x1, y1, x2, y2 = map(int, box)
            box_area = (x2 - x1) * (y2 - y1)
            image_area = image.shape[0] * image.shape[1]
            area_ratio = box_area / image_area

            if area_ratio < 0.001 or area_ratio > 0.5:
                continue

            crop = original_image[y1:y2, x1:x2]
            if crop.size == 0:
                continue

            classification = classify_with_fastembed(crop, category_type="defect", top_k=15)
            mask = np.zeros((image.shape[0], image.shape[1]), dtype=np.float32)
            mask[y1:y2, x1:x2] = 1.0

            defects.append({
                'bbox': (x1, y1, x2, y2),
                'yolo_confidence': float(conf),
                'mask': mask,
                'area_ratio': area_ratio,
                'clip_classification': classification[0] if classification else {'category': 'unknown', 'confidence': 0.0},
                'all_clip_results': classification
            })

    if len(defects) > 0:
        defects = merge_overlapping_detections(defects, iou_threshold=0.5)

    print(f"Detected {len(defects)} defect(s)")
    return {'image': original_image, 'defects': defects}
7.2 Classifier with Qdrant Edge and CLIP
The classifier turns the cropped region into a CLIP embedding and searches for the most similar images in the Qdrant database, then votes on the defect type based on those searches.
def classify_with_fastembed(image_crop, category_type="defect", top_k=15):
    image_pil = Image.fromarray(cv2.cvtColor(image_crop, cv2.COLOR_BGR2RGB))
    temp_path = f"/tmp/query_{category_type}_{uuid.uuid4().hex[:8]}.jpg"
    image_pil.save(temp_path)

    try:
        query_embedding = list(image_model.embed([Path(temp_path)]))[0]

        results = edge_shard.query(
            QueryRequest(
                query=Query.Nearest(query_embedding.tolist(), using=VECTOR_NAME),
                limit=top_k * 2,
                with_vector=False,
                with_payload=True
            )
        )

        defect_votes = {}
        defect_scores = {}

        for result in results:
            defect_type = result.payload['defect_type']
            if defect_type == 'good_leather':
                continue

            similarity = 1 - result.score

            if defect_type not in defect_votes:
                defect_votes[defect_type] = 0
                defect_scores[defect_type] = []

            defect_votes[defect_type] += 1
            defect_scores[defect_type].append(similarity)

        classifications = []
        total_votes = sum(defect_votes.values())

        if total_votes == 0:
            return [{'category': 'unknown', 'confidence': 0.0}]

        for defect_type, votes in defect_votes.items():
            vote_ratio = votes / total_votes
            avg_similarity = np.mean(defect_scores[defect_type])
            confidence = 0.7 * avg_similarity + 0.3 * vote_ratio

            classifications.append({
                'category': defect_type,
                'confidence': float(confidence),
                'votes': votes,
                'avg_similarity': float(avg_similarity),
            })

        classifications.sort(key=lambda x: x['confidence'], reverse=True)
        return classifications

    finally:
        if os.path.exists(temp_path):
            os.remove(temp_path)
7.3 Visualization
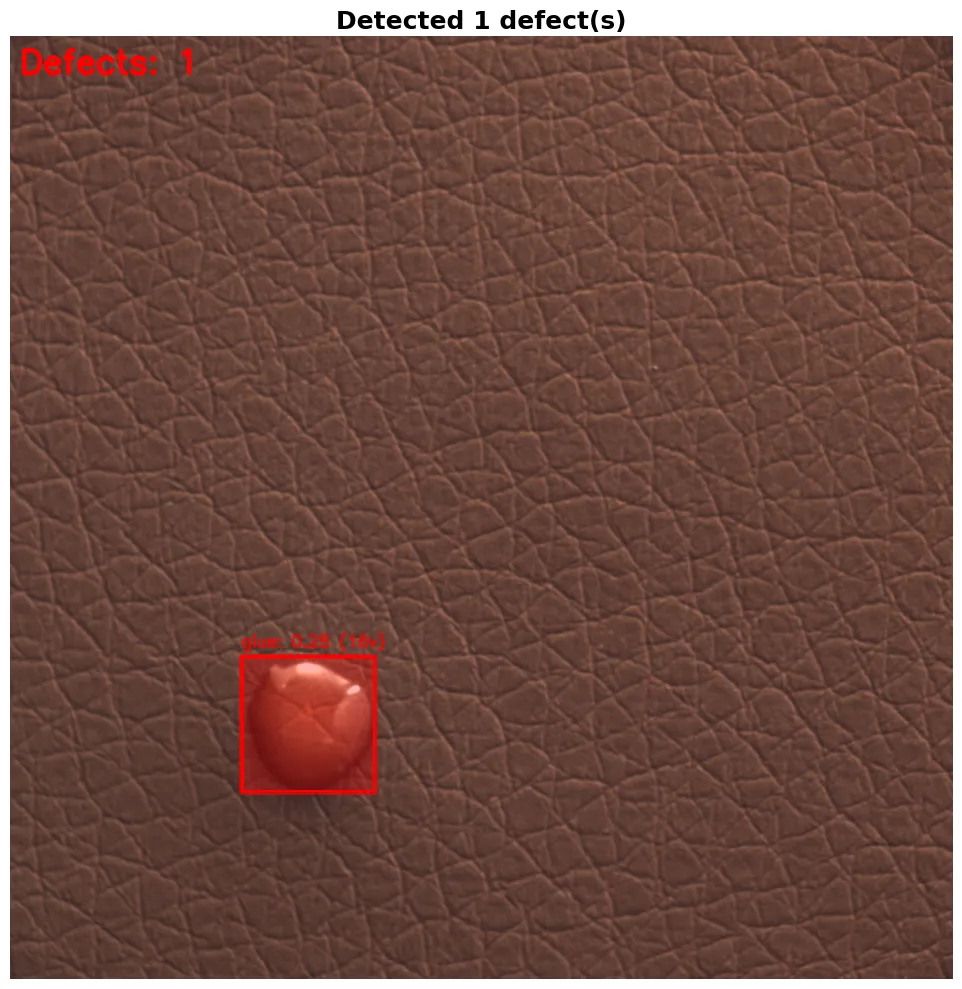
Finally, we visualize the results by highlighting each defect in red, placing a box around it with the predicted label and confidence, and printing a full breakdown of scores for analysing how the model ranked each defect type.
def visualize_defects(result_dict, save_path=None):
    if result_dict is None:
        print("No results to visualize")
        return

    image = result_dict['image'].copy()
    defects = result_dict.get('defects', [])
    overlay = image.copy()
    img_h, img_w = image.shape[:2]

    for defect in defects:
        x1, y1, x2, y2 = defect['bbox']
        mask = defect['mask']
        clip_result = defect['clip_classification']

        mask_resized = cv2.resize(mask, (img_w, img_h))
        color = (0, 0, 255)  # Red for defects
        overlay[mask_resized > 0.5] = color

        cv2.rectangle(image, (x1, y1), (x2, y2), color, 3)

        defect_type = clip_result['category']
        confidence = clip_result['confidence']
        votes = clip_result.get('votes', 0)
        label = f"{defect_type}: {confidence:.2f} ({votes}v)" if votes > 0 else f"{defect_type}: {confidence:.2f}"
        cv2.putText(image, label, (x1, y1 - 10), cv2.FONT_HERSHEY_SIMPLEX, 0.6, color, 2)

    result_image = cv2.addWeighted(image, 0.7, overlay, 0.3, 0)
    result_image_rgb = cv2.cvtColor(result_image, cv2.COLOR_BGR2RGB)

    fig, ax = plt.subplots(figsize=(15, 10))
    ax.imshow(result_image_rgb)
    ax.axis('off')
    ax.set_title(f"Detected {len(defects)} defect(s)", fontsize=18, fontweight='bold')

    if save_path:
        plt.savefig(save_path, bbox_inches='tight', dpi=150)
    plt.tight_layout()
    plt.show()
    plt.close(fig)
Step 8: Testing
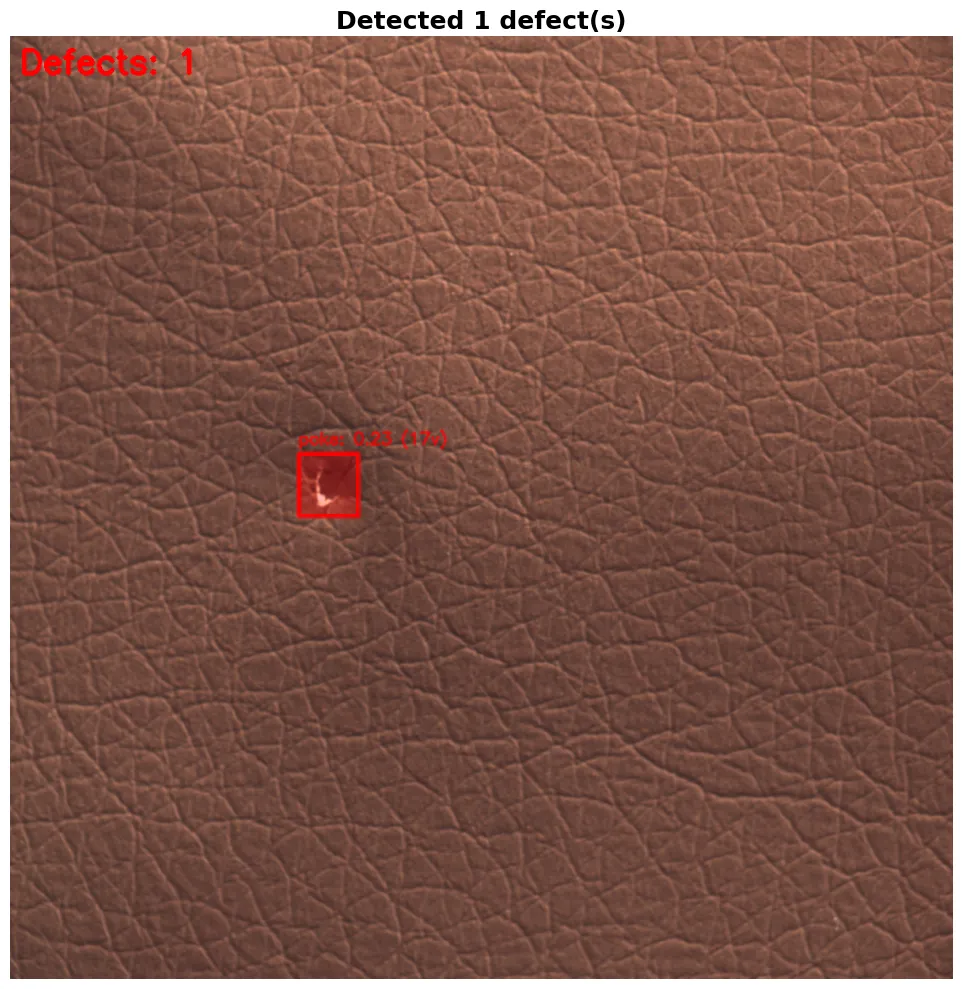
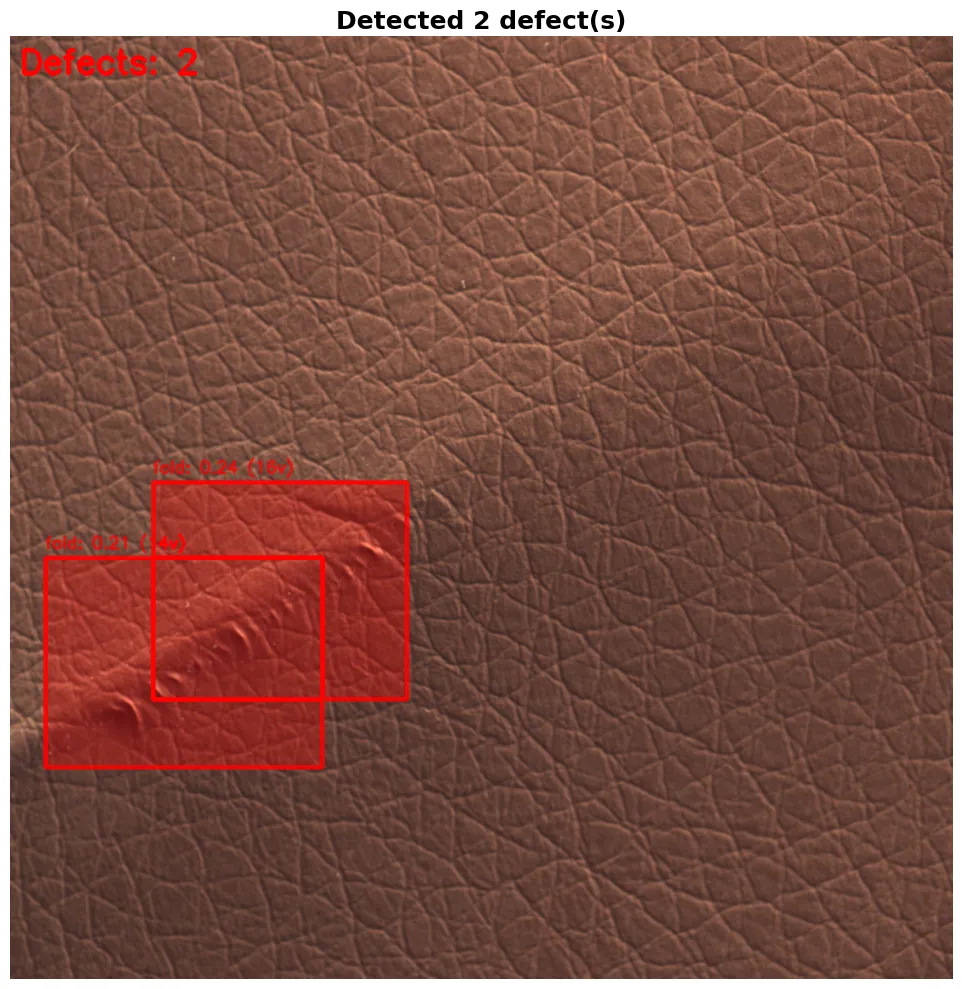
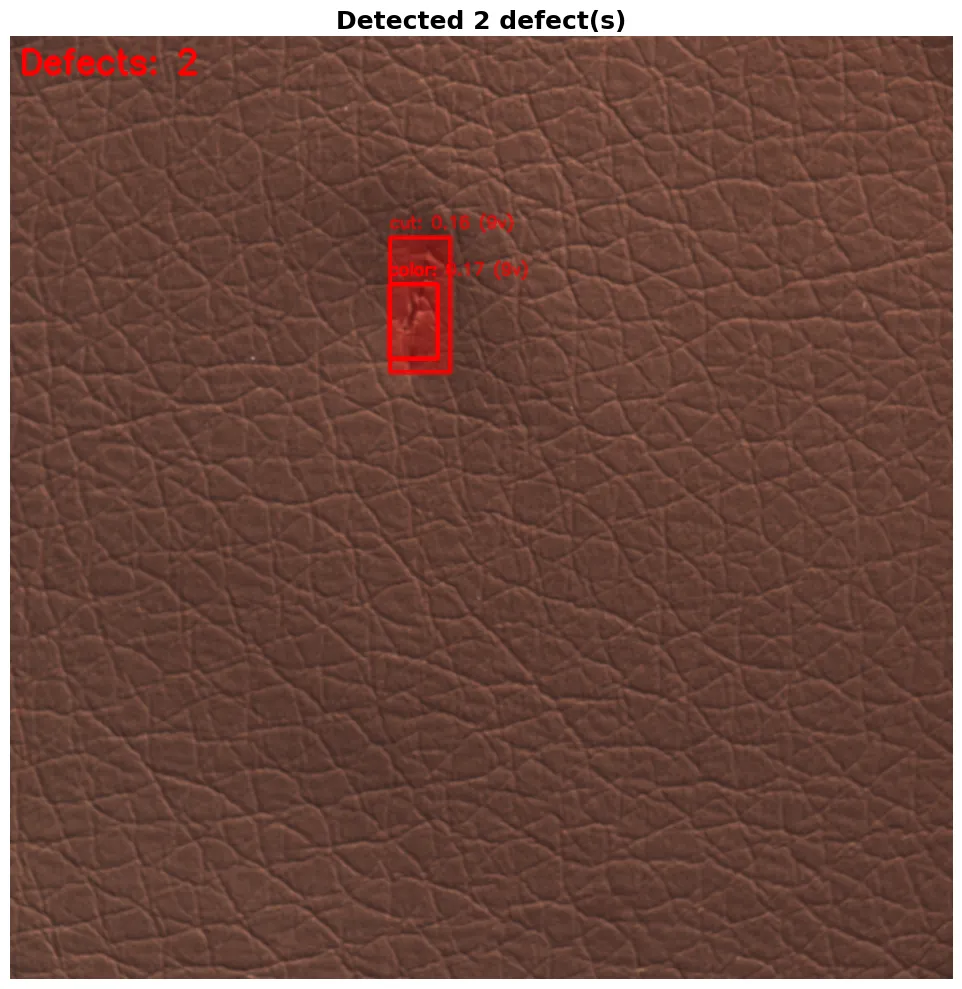
Now we can test the full pipeline by running on one sample image from each defect type to see how well it performs. Each image is passed through detect_and_classify_defects with a low confidence threshold of 0.15 to catch as many defects as possible, and the results are displayed using visualize_defects.
test_images = [
    f"{MVTEC_ROOT}/test/color/005.png",
    f"{MVTEC_ROOT}/test/cut/005.png",
    f"{MVTEC_ROOT}/test/fold/005.png",
    f"{MVTEC_ROOT}/test/glue/005.png",
    f"{MVTEC_ROOT}/test/poke/005.png"
]

for img_path in test_images:
    if os.path.exists(img_path):
        print(f"Expected defect type: {os.path.basename(os.path.dirname(img_path))}")
        result = detect_and_classify_defects(img_path, conf_threshold=0.15, iou_threshold=0.9)

        if result is None:
            print("Failed to process image")
            continue

        visualize_defects(result)
    else:
        print(f"Image not found: {img_path}")
Step 9: Export Models for DeepStream (Optional)
You can optionally use DeepStream to deploy this pipeline on edge devices for real-time video inference. DeepStream works best with optimized model formats, for which we need to export to ONNX first and then to a TensorRT engine which runs significantly faster on NVIDIA GPUs using FP16 precision.
import os, json

onnx_path = yolo_model.export(format='onnx', simplify=True, dynamic=False, imgsz=640)
print(f"ONNX model: {onnx_path}")

engine_path = yolo_model.export(
    format='engine',
    device=0,
    half=True,
    workspace=4,
    imgsz=640
)
print(f"TensorRT engine: {engine_path}")

model_info = {
    'onnx_path': str(onnx_path),
    'engine_path': str(engine_path),
    'input_size': 640,
    'num_classes': 2,
    'class_names': ['leather', 'defect'],
    'confidence_threshold': 0.15,
    'iou_threshold': 0.7
}

with open('deepstream_model_info.json', 'w') as f:
    json.dump(model_info, f, indent=2)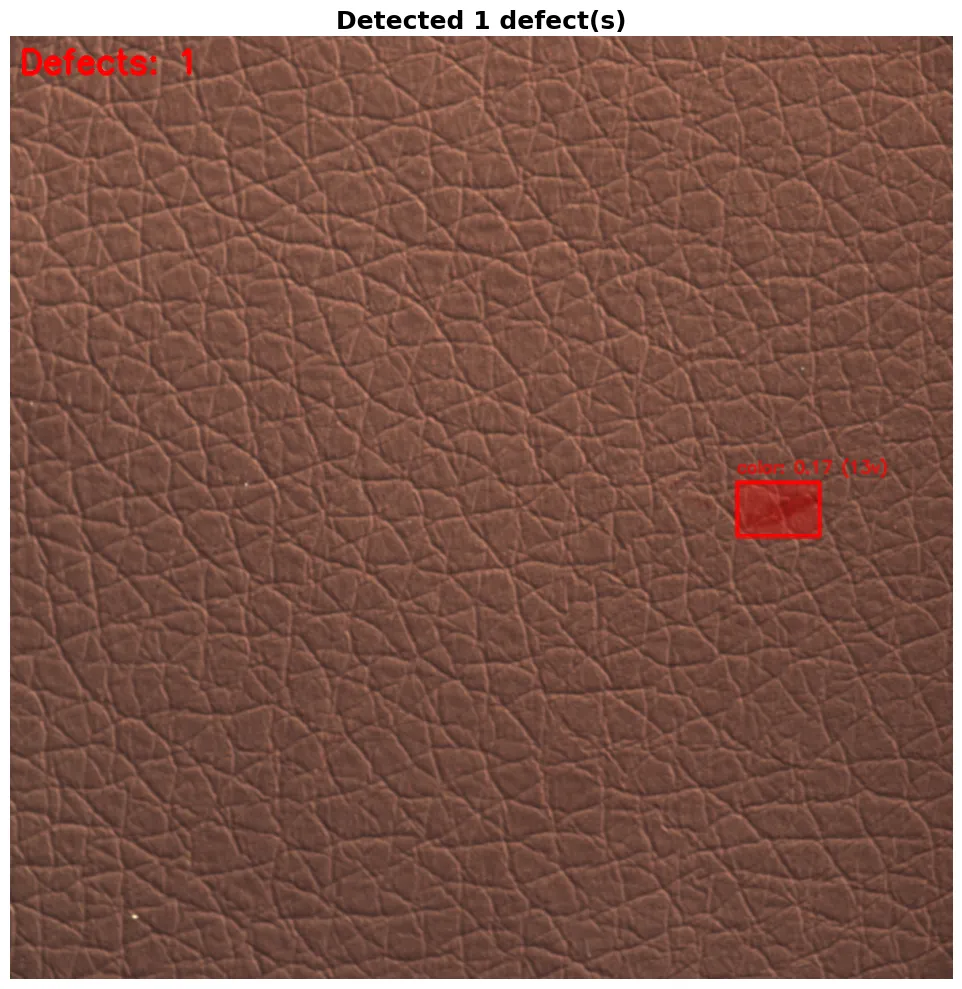
Conclusion
With this approach, we have built a defect detection system that instead of relying only on classification, operates as an AI agent that continuously processes and evaluates real-world data. It observes production through images and video streams, converts visual information into embeddings, and compares them against a learned baseline of normal behavior, which allows it to detect both known defects and completely new anomalies without explicit retraining. It effectively observes, remembers and decides within a single loop, making it practical to deploy and scale in real manufacturing settings.
At Superteams, we help you build AI agents customized to your business needs. To learn more, speak to us.